title: Android SDK Integration Guide description: Complete guide to integrate Appgain.io SDK into your Android app for push notifications, deep linking, and marketing automation keywords: Android SDK, Appgain.io, push notifications, deep linking, marketing automation, Firebase integration tags: [Android, SDK, integration, push notifications, deep linking] author: Appgain.io Team date: 2024-01-01
Getting Started
This Tutorial aims to teach the user how to integrate his native Android app with Appgain.io cloud using appgain.io SDK and how to use the appgain.io products
📚 Related Documentation
- *Setup Guides*: New Project Setup | Dashboard Configuration
- *Push Setup*: Google Server API Key
- *Other SDKs*: iOS SDK | Flutter SDK | Web SDK
- *Marketing*: Push Notifications | Marketing Automation
Android Studio uses Gradle (an advanced build toolkit) to automate and manage the build process while allowing you to define flexible custom build configurations. You can refer to Android Studio's Build Guide for additional details.
Required For Setup
- Android Studio
- Appgain.io Account if you do not already have one
- Your Appgain.io Project ID, available in Project Settings
- Generate Android Push Credentials
Generate Credentials
Before setting up the Android SDK, you must generate the appropriate credentials for the platform(s) you are releasing on:
- Android Generate a Google Server API Key
Installation
-
**go to https://firebase.google.com and log in with a Google Account.
-
At Firebase Website, in the right corner click on GO TO CONSOLE and click on Add Project , then give your Project a name.
-
Click on the settings icon next to Project Overview and then click on Project Settings
-
Click on GENERAL > Add Firebase to your Android app icon then fill in fields with:
- Android package name: you can find it's value inside application Id value in app/build.gradle
- Debug signing certificate SHA-1, you can get it from:
- Android studio > Gradle menu in (right toolbar of android studio)
- Click on app menu
- Click on android menu
- Click on android on signingReport tas
- Get SHA1 from run menu
- Return to Firebase console click on REGISTER APP.
- Download google-services.json file
-
Add google-services.json file to app folder in your android project files
-
Open the build.gradle file in the root directory of your Android Studio project.
- Go to allprojects > repositories and configure the Maven repository address for the Appgain Core SDK.
    allprojects {
        repositories {
            maven { url "https://sdk.appgain.io/repository/maven-releases/" }
            google()
            jcenter()
        }
    }
- Open the build.gradle directory in the app's root directory of your project.
- Add following lines under dependencies.
   dependencies {
      implementation 'io.appgain.sdk:appgain-android:5.0.1'
          implementation platform('com.google.firebase:firebase-bom:31.0.1')
          implementation 'com.google.firebase:firebase-analytics'
      implementation 'com.google.firebase:firebase-messaging'
      implementation 'com.google.android.gms:play-services-ads-lite:21.3.0'
      implementation 'com.google.android.gms:play-services-location:21.0.0'
      implementation 'io.reactivex.rxjava2:rxandroid:2.1.1'
      implementation 'io.reactivex.rxjava2:rxjava:2.2.20'
      implementation 'com.squareup.retrofit2:converter-scalars:2.1.0'
      implementation 'com.squareup.retrofit2:adapter-rxjava2:2.9.0'
    implementation 'com.android.support.constraint:constraint-layout:1.1.3'
      implementation 'com.squareup.retrofit2:retrofit:2.3.0'
      implementation 'com.squareup.retrofit2:converter-gson:2.3.0'
      implementation 'com.squareup.okhttp3:logging-interceptor:3.11.0'
      implementation 'com.google.android.exoplayer:exoplayer:2.19.1'
      implementation 'com.github.bumptech.glide:glide:4.15.1'
      annotationProcessor  'com.github.bumptech.glide:compiler:4.15.1'
    }
- open your project/build.gradle file and add following line under dependencies
 dependencies {
    classpath 'com.google.gms:google-services:latest_version'
 }
- in the end of your app/build.gradle file add the following line
apply plugin: 'com.google.gms.google-services'
- update your manifest permissions
<uses-permission android:name="android.permission.INTERNET" />
- make new class called AppController which extend Application class
import android.content.Context;

import androidx.lifecycle.Lifecycle;
import androidx.lifecycle.LifecycleObserver;
import androidx.lifecycle.OnLifecycleEvent;
import androidx.lifecycle.ProcessLifecycleOwner;
import androidx.multidex.MultiDex;
import androidx.multidex.MultiDexApplication;
import io.appgain.sdk.controller.Appgain;
import io.appgain.sdk.model.User;
import io.appgain.sdk.util.Config;


public class AppController extends MultiDexApplication implements LifecycleObserver {

    public static final boolean DEBUG_MODE  =false;
    private static AppController mInstance;
    String TAG  = "AppController";
    public static boolean DIALOG_CANCELLABLE = true;


    @Override
    public void onCreate() {
        super.onCreate();
        mInstance = this;
        ProcessLifecycleOwner.get().getLifecycle().addObserver(this);
        Appgain.enableLog();
    }

    @OnLifecycleEvent(Lifecycle.Event.ON_STOP)
    void onAppBackgrounded() {
        //App in background
        Appgain.onAppBackgrounded();
    }

    @OnLifecycleEvent(Lifecycle.Event.ON_START)
    void onAppForegrounded() {
        // App in foreground
        Appgain.onAppForegrounded();
    }

    @Override
    protected void attachBaseContext(Context base) {
        super.attachBaseContext(base);
        MultiDex.install(this);
    }

    MyPreferenceManager myPreferenceManager ;
    public MyPreferenceManager getPrefManager() {
        if (myPreferenceManager == null) {
            myPreferenceManager = new MyPreferenceManager(this);
        }
        return myPreferenceManager;
    }

    public static MyPreferenceManager getMyPreferenceManager() {
        return getInstance().getPrefManager();
    }

    public static synchronized AppController getInstance() {
        return mInstance;
    }


    public static void saveUser(User user) {
        getMyPreferenceManager().setUser(user);
    }


    public static User getUser() {
        return getMyPreferenceManager().getUser();
    }


    public static Keys getKeys() {
        return getMyPreferenceManager().getKeys();
    }

    public static void saveKeys(Keys keys) {
        getMyPreferenceManager().setKeys(keys);
    }
}
- add those lines into onCreate method
boolean trackAdvertisingId = true;
Appgain.initialize(getApplicationContext(), "APPGAIN_PROJECT_ID" , "APPGAIN_API_KEY", trackAdvertisingId, new AppgainDataCallback<Void>(){
    @Override
    public void onSuccess(Void data) {
        Log.d("Appgain", "init success");

    }

    @Override
    public void onFailure(BaseResponse failure) {
        Log.e("Appgain", "Error:"  failure.getMessage());
    },"PROJECT_SUB_DOMAIN"
});
- Add your new class in name attribute inside application tag in your manifest file.
<application
  android:name=".App.AppController"
  ......
  >
  ............
  ............
  ............
  </application>
Deferred Deep Linking
After a new user has installed your app, our SDK will detect if the app was installed from a smart deep link or not, if it's then our SDK will automatically route their flow to marketing campaign desired location in the app (not just to the default home screen).
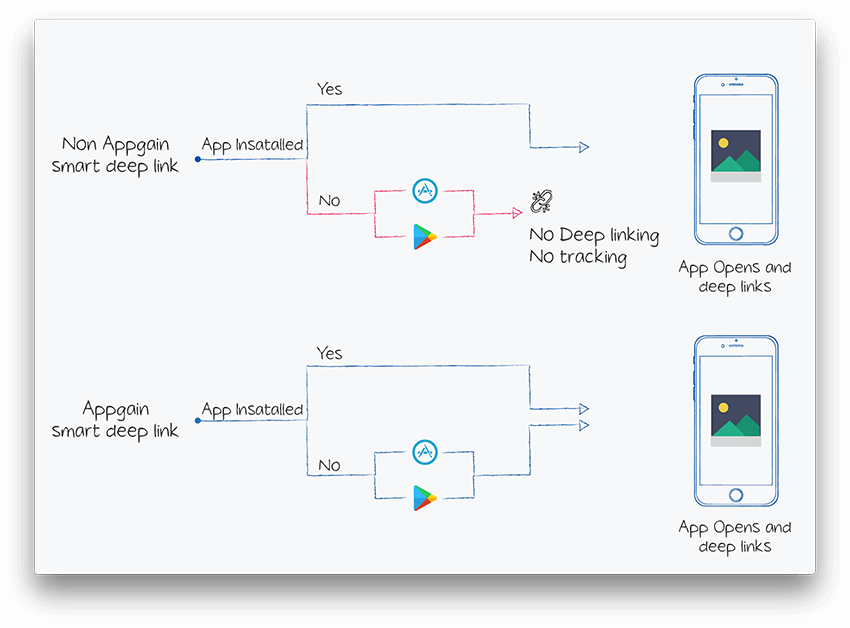
To achieve that, appgain.io SDK must be installed in the app, and the matching process must be initiated
Appgain.matchLink(new AppgainDataCallback<DeferredDeepLinkingResponse>() {
                @Override
                public void onSuccess(DeferredDeepLinkingResponse response) {
                  //do your success handling , like getting the data out of response object
                }

                @Override
                public void onFailure(BaseResponse failure) {


                }
            });
The following data are returned on matching success :
| Returned Field | Description |
|---|---|
| smart_link_url | the URL of smart deep link used to open or install the App |
| smart_link_id | the Id of smart deep link used to open or install the App |
| smart_link_name | the Id of smart deep link used to open or install the App |
| match_type | how the device identification done , it could be basic(Digital fingerprinting) or advertising_id |
| extra_data | array of more data |
| extra_data.userId | user Id that was appended to smart link url on opening it phase |
| params | array of all paramaters appended to smart link url , like SDL URL?utm_source=fb |
| smart_link_primary | primary redirection action |
Micro Pages Creation
LandingPage landingPage = new LandingPage.Builder()
      .withLang("en")
      .withWebPushSubscription(true)
      .withLabel("testcreate")
      .withSocialMedia(" sm title " , " sm description " ," URL")
      .withButton("text", "web", "android", "ios")
      .build();
Appgain.createLandingPage(landingPage, new AppgainDataCallback<String>() {
  @Override
  public void onSuccess(String data) {
      Log.d("createLandingPage", "success");
  }

  @Override
  public void onFailure(BaseResponse failure) {
      Log.e("createLandingPage", "Error:"  failure.getMessage());
  }
});
Marketing Automation
Send Automated and Personalized Push notifications, SMS or Emails based on your user's actions and behavior using Apggain's Powerful Automator, Know More Now!
- Create an auto message in Appgain Dashboard .
- Fire the auto message by using this code.
- you must use the same trigger event that was entered in step 1, as the TriggerPoint in the following code.
without Personalization
Appgain.fireAutomator("triggerPoint", null, new AppgainDataCallback<Void>() {
    @Override
    public void onSuccess(Void data) {
        Log.d("Automator", "success");
    }

    @Override
    public void onFailure(BaseResponse failure) {
        Log.e("Automator", "Message"  failure.getMessage());
    }
});
with Personalization
Map<String,String> personalizationMap = new HashMap<>();
// add personalized parameters
Appgain.fireAutomator("triggerPoint", personalizationMap, new AppgainDataCallback<Void>() {
    @Override
    public void onSuccess(Void data) {
        Log.d("Automator", "success");
    }

    @Override
    public void onFailure(BaseResponse failure) {
        Log.e("Automator", "Message"  failure.getMessage());
    }
});
Revenue Tracking
you can add new Purchase Transactions object by using the following snippet :
Appgain.logPurchase("productName", 100f, "LE", new AppgainDataCallback<Void>() {
@Override
public void onSuccess(Void data) {
    Log.d("logPurchase", "success");
}

@Override
public void onFailure(BaseResponse failure) {
    Log.e("logPurchase", "Error:"  failure.getMessage());
}
});
Custom Events Tracking
at your app whenever you want to log AppEvent, add the following snippet :
Bundle extras = new Bundle();
// add extra parameters
extras.putBoolean("key1",value1);
/*example extras.putInt("numItems",numItems)
extras.putString("currency",currency)
extras.putDouble("total_price",total)
extras.putDouble("CartValue",total)
* /
Appgain.logEvent("Event", "Action", extras, new AppgainDataCallback<Void>() {
    @Override
    public void onSuccess(Void data) {
        Log.d("logEvent", "success");
    }

    @Override
    public void onFailure(BaseResponse failure) {
        Log.e("logEvent", "Message"  failure.getMessage());
    }
});
Set Custom User Attributes
at your app whenever you want to Set Custom User Attributes , add the following snippet :
HashMap<String, String> userData = new HashMap<>();
userData.put("CustomProperty", "CustomValue");
Appgain.updateUserData(userData, new AppgainDataCallback<Void>() {
    @Override
    public void onSuccess(Void data) {
        // success
    }
    @Override
    public void onFailure(BaseResponse failure) {
        // failure
    }
});
Smart Deep Link Creation
Add your smart deep link values:
-
Name: give an identifier for your smart deep link, you might want to use it when creation a deep page.
-
Description: describe your smart link for social representation.
-
Android target: when your smart link is opened from android device, you have to choose a primary link for the users to be directed to, and in case this primary link is not working, the secondary link should open.
-
IOS target: when your smart link is opened from iOS device, you have to choose a primary link for the users to be directed to, and in case this primary link is not working, the secondary link should open. Note that both the primary and fallback links are mandatory, also they can be just simple URLS or deep links.
-
Web URL: when your smart link is opened from a PC, you have to choose where does the smart link shall direct the user.
-
Create Smart Deep Link Builder:
SmartLinkCreator.Builder builder = new SmartLinkCreator.Builder();
- Add your smart deep link values (name, description, android target, IOS target, web URL, page message)
| Field | Description |
|---|---|
| Name | Give an identifier for your smart deep link, you might want to use it when creating a deep page |
| Description | Describe your smart link for social representation to be seen when smart link is shared on social media |
| Android Target | When your smart link is opened from Android device, you have to choose a primary link for the users to be directed to, and in case this primary link is not working, the secondary link should open |
| iOS Target | When your smart link is opened from iOS device, you have to choose a primary link for the users to be directed to, and in case this primary link is not working, the secondary link should open. Note that both the primary and fallback links are mandatory, also they can be just simple URLs or deep links |
| Web URL | When your smart link is opened from a PC, you have to choose where the smart link shall direct the user |
| Social Media Title | Set page title for users to be seen when smart link is opened |
| Social Media Description | Describe your smart link for users to be seen when smart link is opened |
| Social Media Image | Set a landing image link for users to be seen when smart link is opened |
SmartDeepLinkCreator smartDeepLinkCreator = new SmartDeepLinkCreator.Builder()
 .withName("Page name")
 .withAndroid("Primary URL", "Fallback URL")
 .withIos("Primary URL", "Fallback URL")
 .withWeb("Web URL")
 .withSocialMediaTitle("title")
 .withSocialMediaDescription("Description...")
 .withSocialMediaImage("URL")
 .build();
Appgain.createSmartLink(smartDeepLinkCreator, new AppgainDataCallback<String>() {
@Override
public void onSuccess(String link) {
 Log.d("createSmartLink", "success");
}

@Override
public void onFailure(BaseResponse failure) {
 Log.e("createSmartLink", "Error:"  failure.getMessage());
}
});
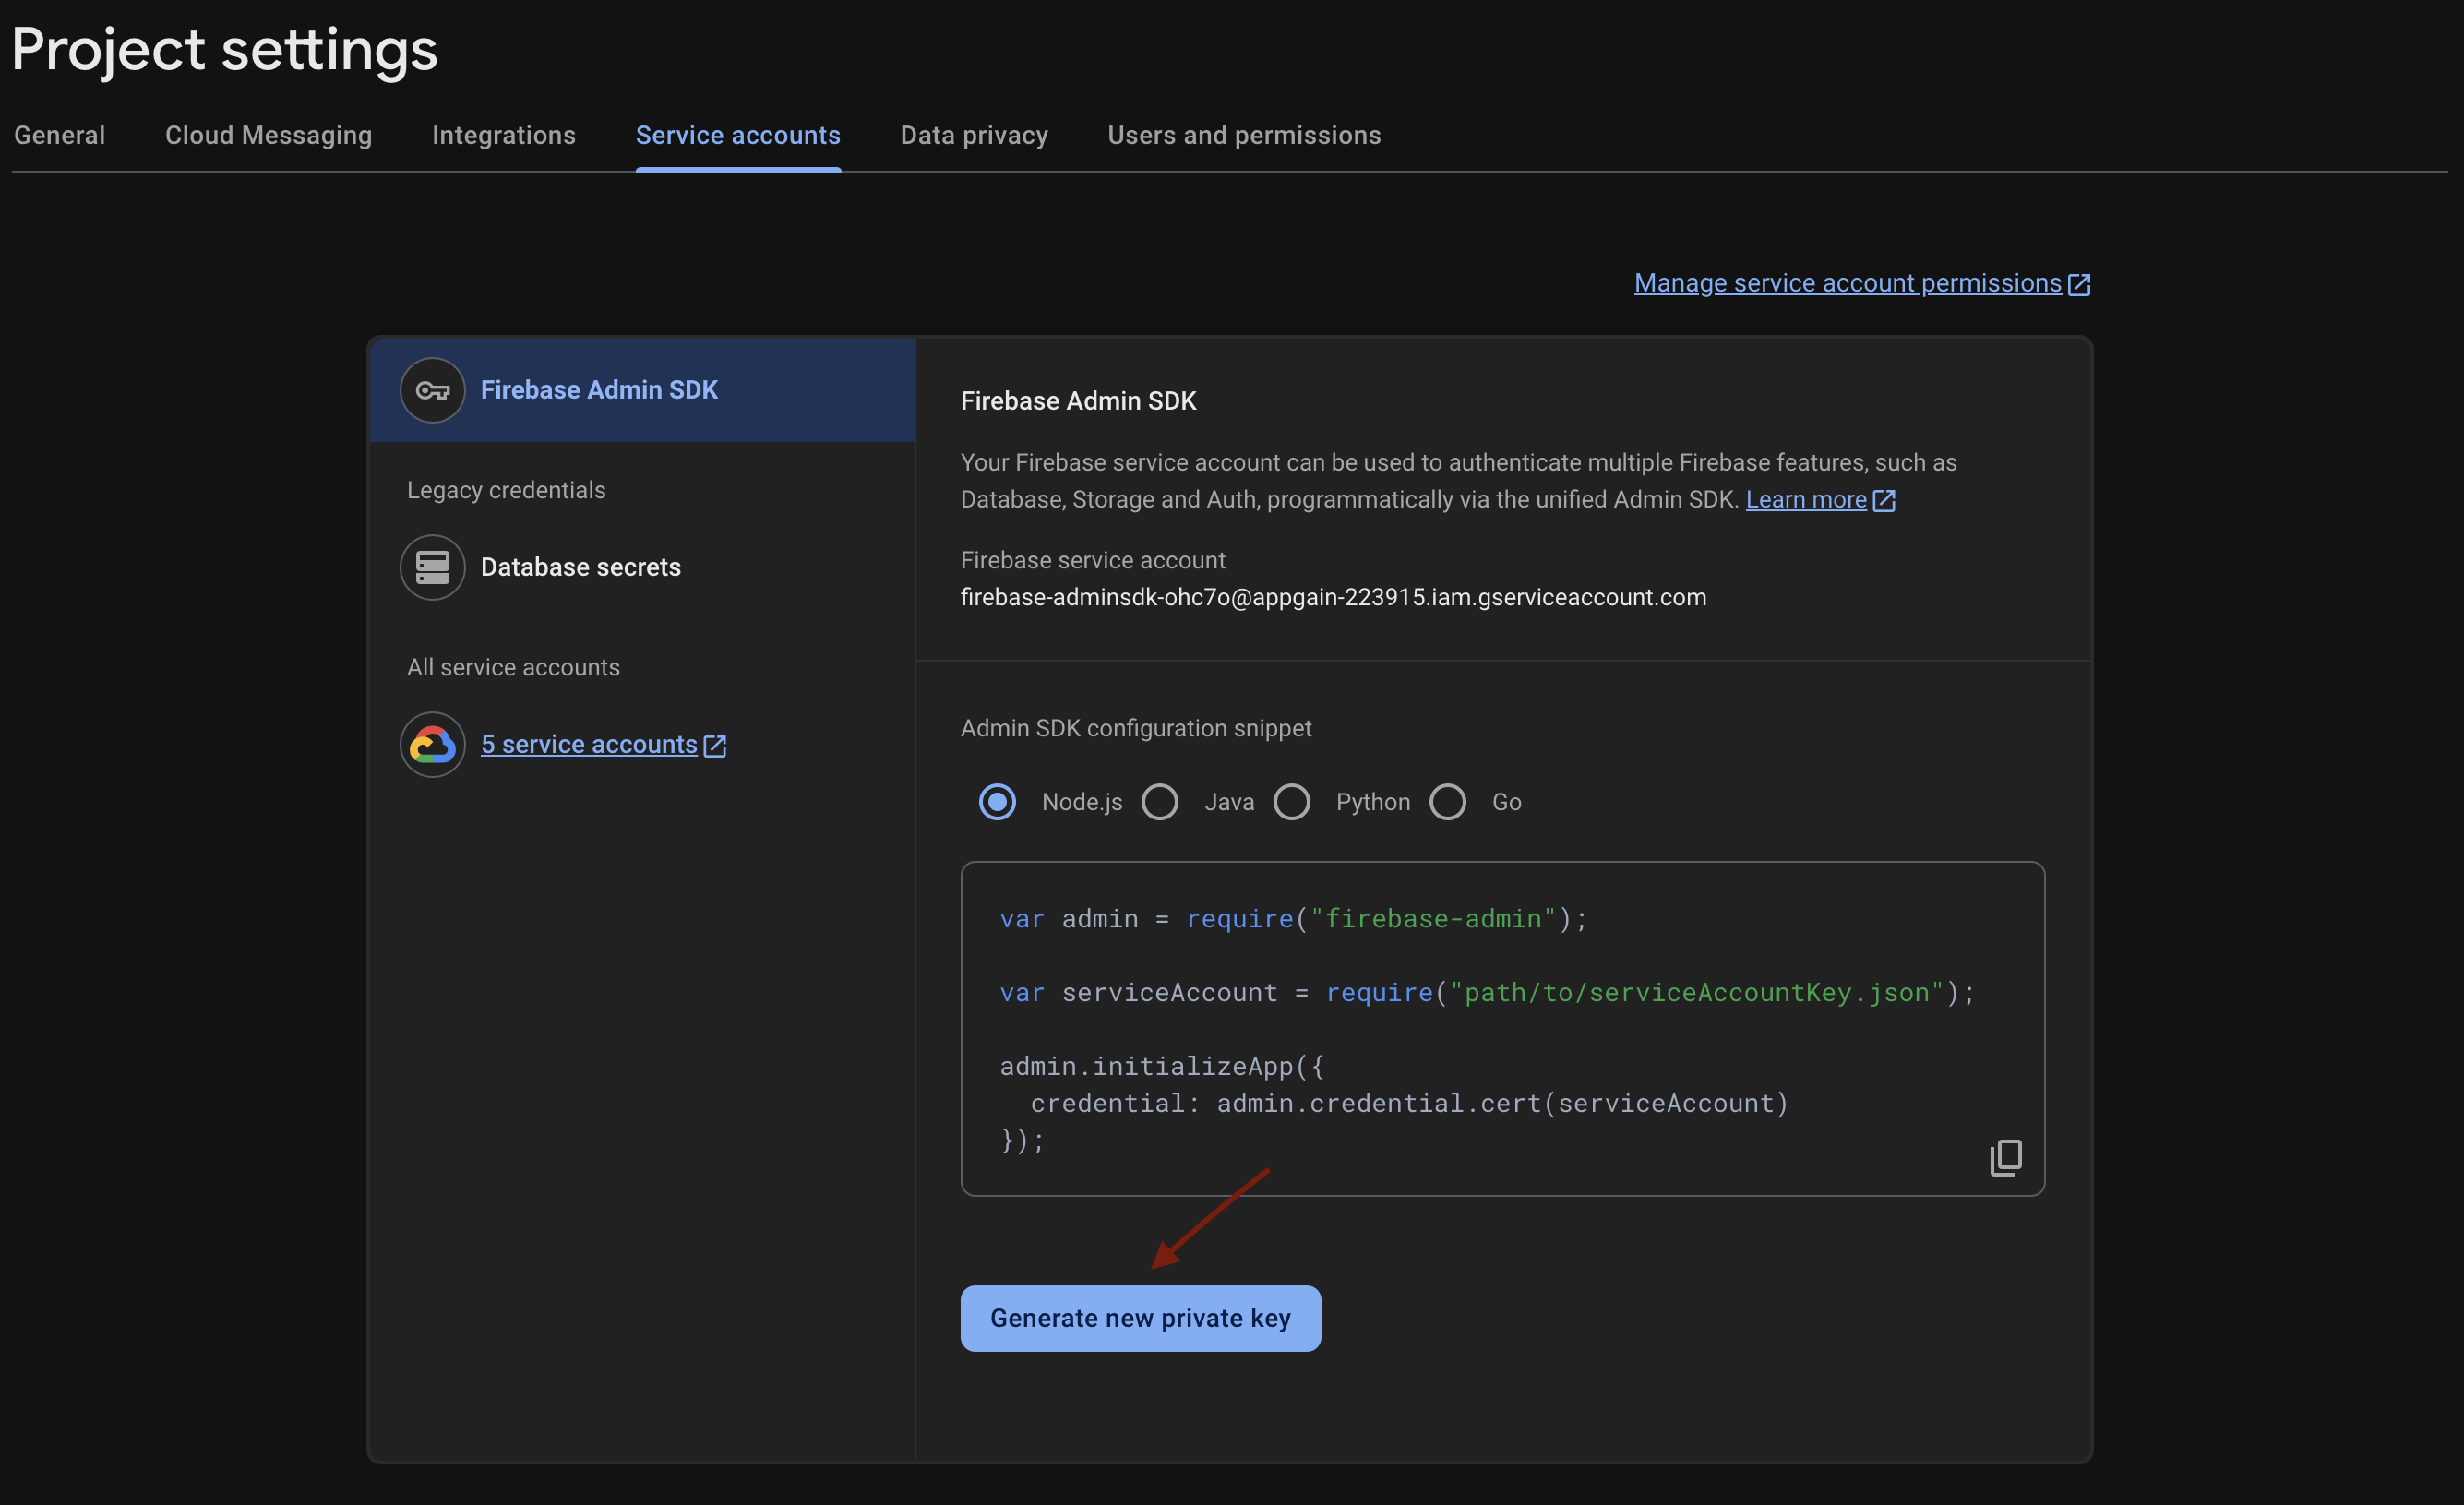
Push Notification setup
- **Open the Firebase console, and go to your project.
-
Click the settings icon next to Project Overview and select Project Settings.
-
go to the Service Accounts tab in Project Settings, then click Generate new private key to download the JSON file.
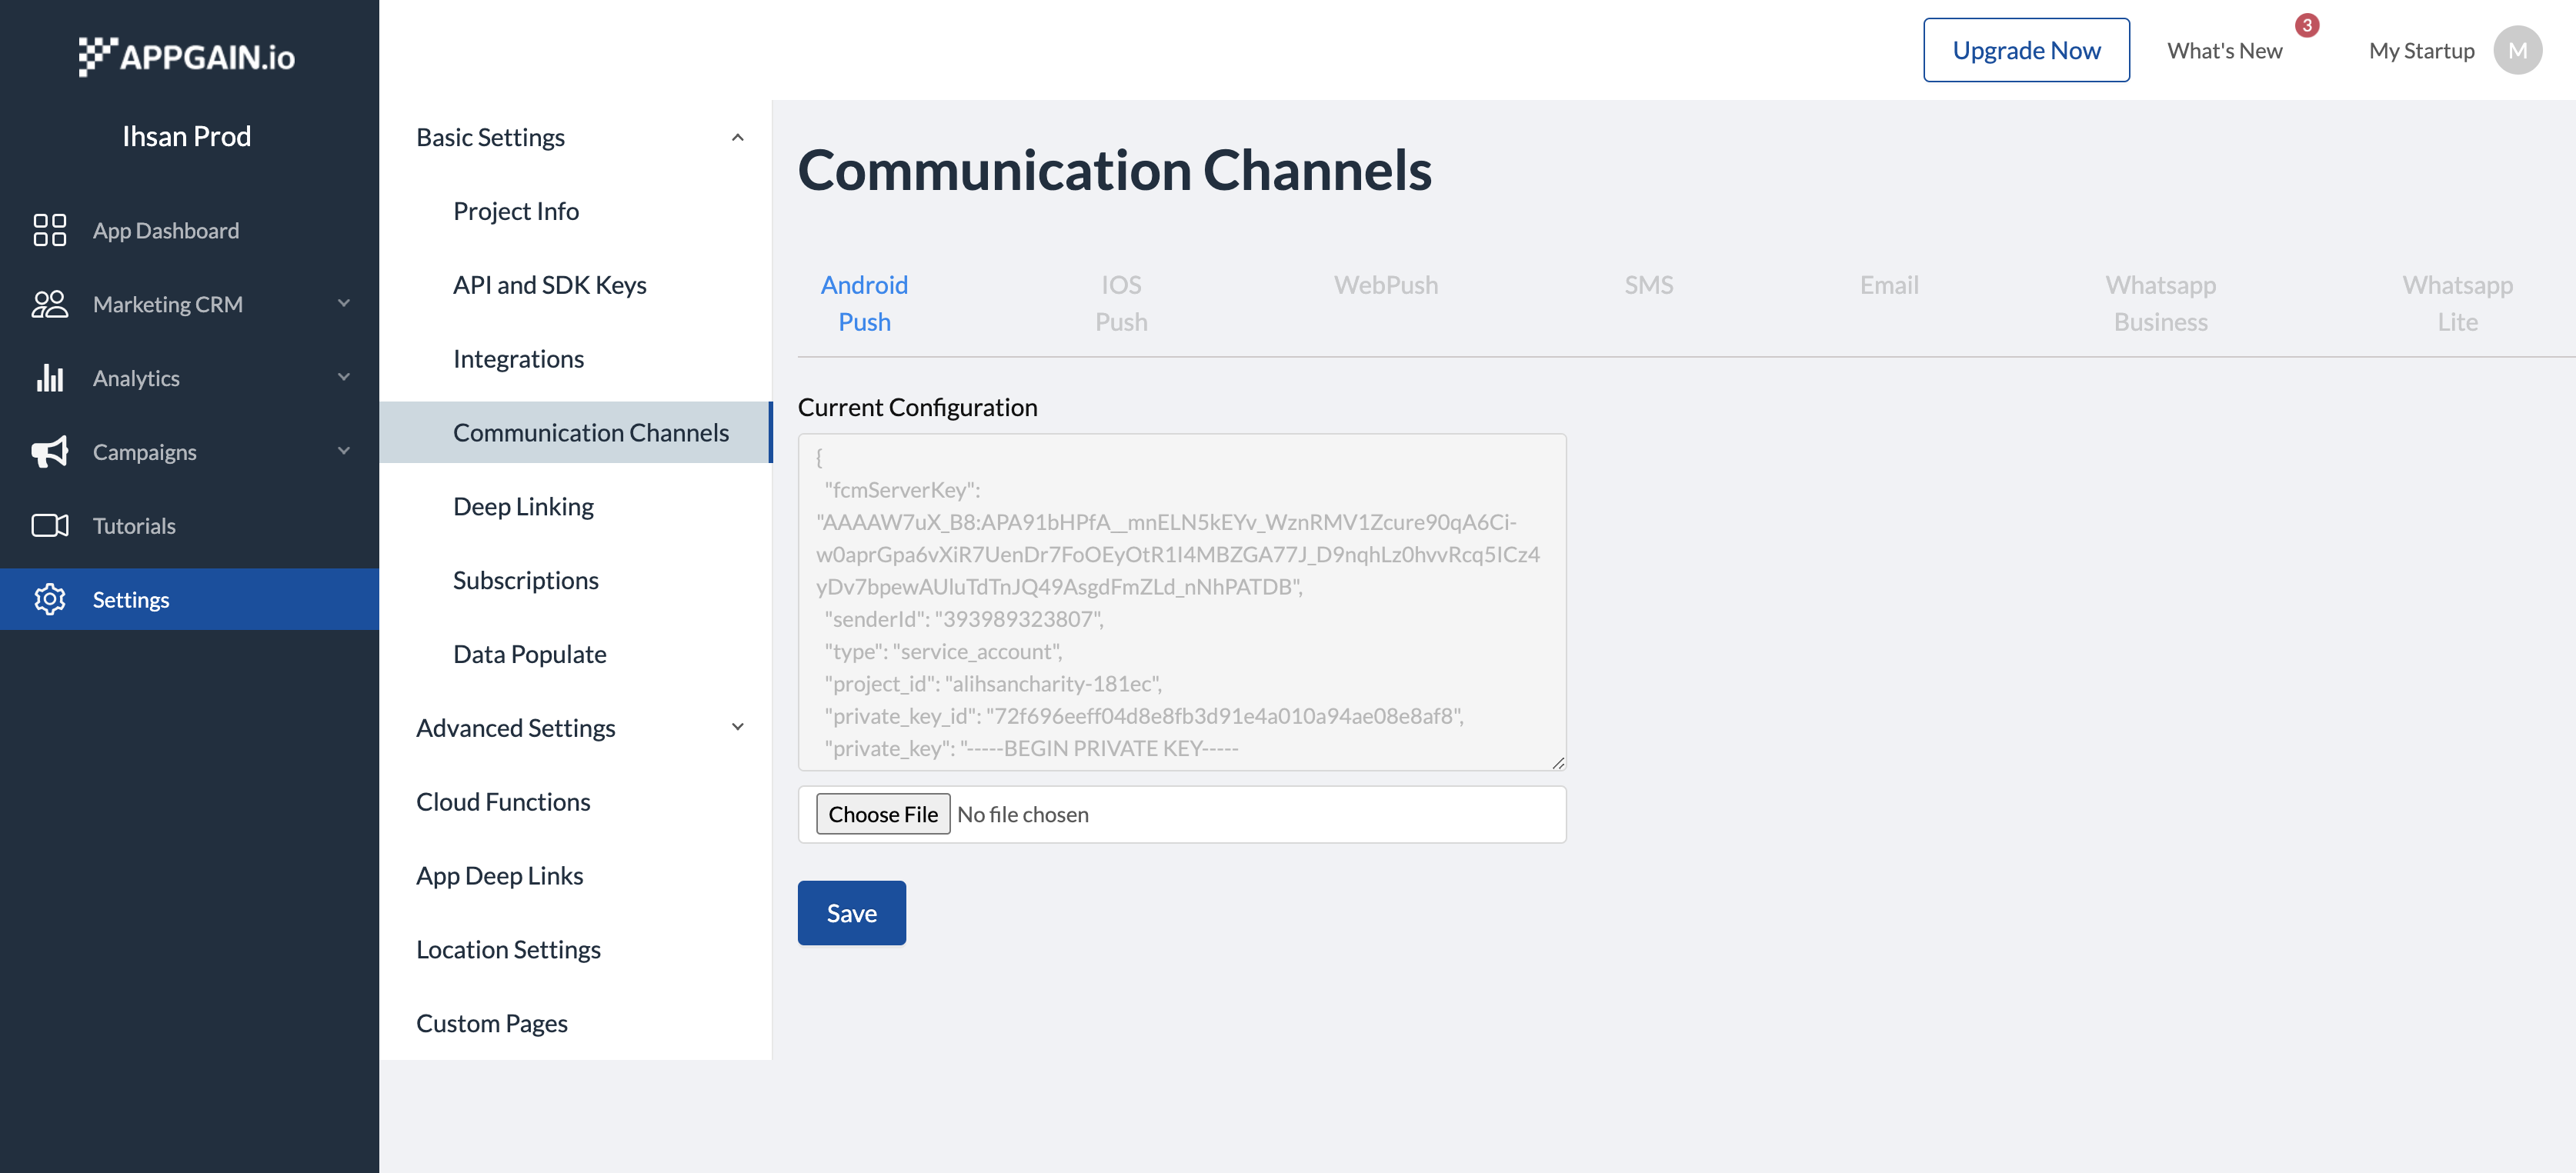
- **Open the Appgain Dashboard
- Go to Setting > Communication Channels
- Navigate to the Android push tab
- Upload your JSON file
SDK configuration
- Setup SDK in AppController
boolean trackAdvertisingId = true;
Appgain.initialize(getApplicationContext(), "APPGAIN_PROJECT_ID" , "APPGAIN_API_KEY", trackAdvertisingId, new AppgainDataCallback<Void>(){
    @Override
    public void onSuccess(Void data) {
        Log.d("Appgain", "init success");

    }

    @Override
    public void onFailure(BaseResponse failure) {
        Log.e("Appgain", "Error:"  failure.getMessage());
    }
});
- Adding permission to your manifest
<uses-permission android:name="android.permission.INTERNET" />
- inside your application tag add
<service
android:name="io.appgain.sdk.controller.AppgainMessagingService">
<intent-filter>
    <action android:name="com.google.firebase.MESSAGING_EVENT"/>
</intent-filter>
</service>

<meta-data
    android:name="com.parse.push.notification_icon"
    android:resource="@drawable/ic_app_notfication" />
- Create new class MyPushReceiver which extend AppGainPushReceiver and implement onReceive method
import android.content.Context;
import android.content.Intent;
import android.util.Log;
import android.widget.Toast;
import androidx.annotation.NonNull;
import io.appgain.sdk.controller.AppgainPushReceiver;
import io.appgain.sdk.model.push.ReceiveStatus;

public class MyPushReceiver extends AppgainPushReceiver {
    @Override
    protected void onReceive(Context context, ReceiveStatus receiveStatus, Intent intent) {
    // doing some action after receiving
    }
}
- Make receiver with your new class in your application tag in Manifest file
<application
    ....
    >
    <receiver
    android:name=".MyPushReceiver"
    android:exported="false">
    <intent-filter>
    <action android:name="com.parse.push.intent.RECEIVE" />
    <action android:name="com.parse.push.intent.DELETE" />
    <action android:name="com.parse.push.intent.OPEN" />
    </intent-filter>
    </receiver>
    ....
</application>
-
Our PushNotification working on Firebase PushNotification Data key which is manly for foreground app so to you can our background battery optimize helper function to make sure it will be deliver on foreground and background
-
you have to add different pixels for the launcher icon to avoid empty notification icon
-
Add ignore battery optimization permission to your manifest
<uses-permission android:name="android.permission.REQUEST_IGNORE_BATTERY_OPTIMIZATIONS" />
- To use helper method
PowerUtils.startPowerMangerIntents(this , getString(R.string.allow_background));
Custom Push Receiver
in some cases , if you have your own Push receiver and cannot use Appgain Push Receiver as your default push entry point , you can use our custom Push receiver
- add below code at your push receiver
CustomPushReceiver mycustomPushRec = new CustomPushReceiver();

    mycustomPushRec.onCustomPushReceive(this.getApplicationContext(),remoteMessage);
Handling Push URL
To implement custom URL handling for notifications you just have to extend AppgainPushReceiver and override the onPushNotificationReceived and now you would have access to the PushDataReceiveModel pushDataReceiveModel
public class PushReceiver extends AppgainPushReceiver {

   private static final String TAG = "PushReceiver";


    @Override
    protected void onPushNotificationReceived(
          Context context,
          ReceiveStatus receiveStatus,
          Intent intent,
          PushDataReceiveModel pushDataReceiveModel
    ) {
       super.onPushNotificationReceived(
             context,
    receiveStatus,
    intent,
    pushDataReceiveModel
       );

       // attachment url, any link or attachment can be retrieved here
       String attachment = pushDataReceiveModel.getAttachment();
       String type = pushDataReceiveModel.getType();


       // the message text that you enter in the dashboard
       String alert = pushDataReceiveModel.getAlert();

       String campaignName = pushDataReceiveModel.getCampaignName();
       String campaignId = pushDataReceiveModel.getCampaignId();

       // this is the url attached in any push notification
       // you can use it for deepLinks or any other purpose
       // it is mostly used with text-with-url
       String url = pushDataReceiveModel.getUrl();
    }

    @Override
    protected void onPushNotificationOpened(
          Context context,
          ReceiveStatus receiveStatus,
          Intent intent, PushDataReceiveModel
                pushDataReceiveModel
    ) {
       super.onPushNotificationOpened(
             context,
             receiveStatus,
             intent,
             pushDataReceiveModel
       );

       // attachment url, any link or attachment can be retrieved here
       String attachment = pushDataReceiveModel.getAttachment();
       String type = pushDataReceiveModel.getType();


       // the message text that you enter in the dashboard
       String alert = pushDataReceiveModel.getAlert();

       String campaignName = pushDataReceiveModel.getCampaignName();
       String campaignId = pushDataReceiveModel.getCampaignId();

       // this is the url attached in any  push notification
       // you can use it for deepLinks or any other purpose
       // it is mostly used with text-with-url
       String url = pushDataReceiveModel.getUrl();


    }
}
Push Conversion Tracking
Stay informed of user flow and make further improvements based on detailed real time conversion metrics , the following events are tracked :
- received: android only users who got the push
- dismissed: android only users who dismissed the push and didn't open it
- open: users opened the push
- conversion: users performed the conversion action, its recorded either automatically when your App record purchase tranaction or by using the below code .
   Appgain.recordConversion("action", 100, "campaignName", "campaignId", new AppgainDataCallback<Void>() {
   @Override
   public void onSuccess(Void data) {
       Log.d("recordConversion", "success");
   }

   @Override
   public void onFailure(BaseResponse failure) {
       Log.e("NotificationChannels", "Error:"  failure.getMessage());
   }
   });
Getting Appgain user Id
   Appgain.getUserId(new AppgainDataCallback<String>() {
       @Override
       public void onSuccess(String userId) {
       }
       @Override
       public void onFailure(BaseResponse errorResponse) {
       }
   });
Notification Channels
This Tutorial aims to teach the user how to add user Notification and messaging preferences in channels such as SMS and Email
   Appgain.updateNotificationChannels("email", "phone", new AppgainDataCallback<Void>() {
    @Override
    public void onSuccess(Void data) {
        Log.d("NotificationChannels", "success");
    }

    @Override
    public void onFailure(BaseResponse failure) {
        Log.e("NotificationChannels", "Error:"  failure.getMessage());

    }
   });
Finally You Can Use Appgain SDKTestApp to Test Appgain Features Before Integrate Your App with Appgain
Frequently Asked Questions (FAQ)
What is the Appgain.io Android SDK?
The Appgain.io Android SDK is a native Android library that enables integration with Appgain.io's marketing platform, providing features like push notifications, deep linking, user tracking, and marketing automation.
What are the prerequisites for Android SDK integration?
You need: - Android Studio - Appgain.io account and Project ID - Firebase project setup - Google Server API Key for push notifications
How do I set up Firebase for the Android SDK?
- Create a Firebase project at firebase.google.com
- Add your Android app to the project
- Download google-services.json
- Add it to your app folder
- Configure the build.gradle files
What dependencies are required for the Android SDK?
The main dependencies include:
- **io.appgain.sdk**:appgain-android:5.0.0
- Firebase messaging and analytics
- Google Play Services
- Retrofit for networking
- ExoPlayer for media
How do I initialize the Android SDK?
Use Appgain.init() with your Project ID and API Key in your Application class or MainActivity.
What features does the Android SDK provide?
- Push notifications with rich media
- Deep linking and deferred deep linking
- User tracking and analytics
- Marketing automation triggers
- Revenue tracking
- Custom event logging
How do I handle push notifications?
The SDK automatically handles push notifications. You can customize the notification display and handle notification clicks through the provided callbacks.
Can I test the SDK before full integration?
Yes, you can download the Appgain SDK Test App to test all features before integrating into your production app.
How do I get the user ID from the SDK?
Use Appgain.getUserId() with a callback to retrieve the unique user identifier.
What notification channels are supported?
The SDK supports multiple channels including email, SMS, and push notifications, which can be configured through the notification channels API.