Appgain SDK Plugin
This is a Flutter plugin that implemented Appgain SDK.
Appgain.io helps mobile apps grow with deep links that power referral systems, sharing links and invites with full attribution and analytics.
Table of contents
- Handling notifications
- Add Appgain Rich Notification
-
This Tutorial aims to teach the user how to integrate his Cross Platform Flutter app with Appgain.io cloud using appgain.io SDK and how to use the appgain.io products
To integrate the Appgain SDK in your flutter app, you have to use Appgain.io pub dev For a flutter application integrated with Appgain SDK for ios and android, please refer to our Appgain Flutter TestApp
Getting Started
Required For Setup
- Appgain.io Account if you do not already have one
-
Your Appgain.io Project ID , Available at Project Settings Screen
-
Generate iOS Push CertificateGenerate an iOS Push Certificate
-
Generate Android Push Credentials Generate a Google Server API Key
-
First
Run this command: With Flutter:
$ flutter pub add appgain_sdk
This will add a line like this to your package's pubspec.yaml (and run an implicit flutter pub get):
dependencies:
appgain_sdk: ^0.0.10
Alternatively, your editor might support flutter pub get. Check the docs for your editor to learn more.
- Import it
Now in your Dart code, you can use:
import 'package:appgain_sdk/appgain_sdk.dart';
Installation
- add those lines into **your App Entry Point** to initialize Appgain SDK
///required appId => String
///required apiKey => String
Appgain().initAppgainSDK(appId : 'YOUR APP ID',apiKey:'YOUR API KEY');
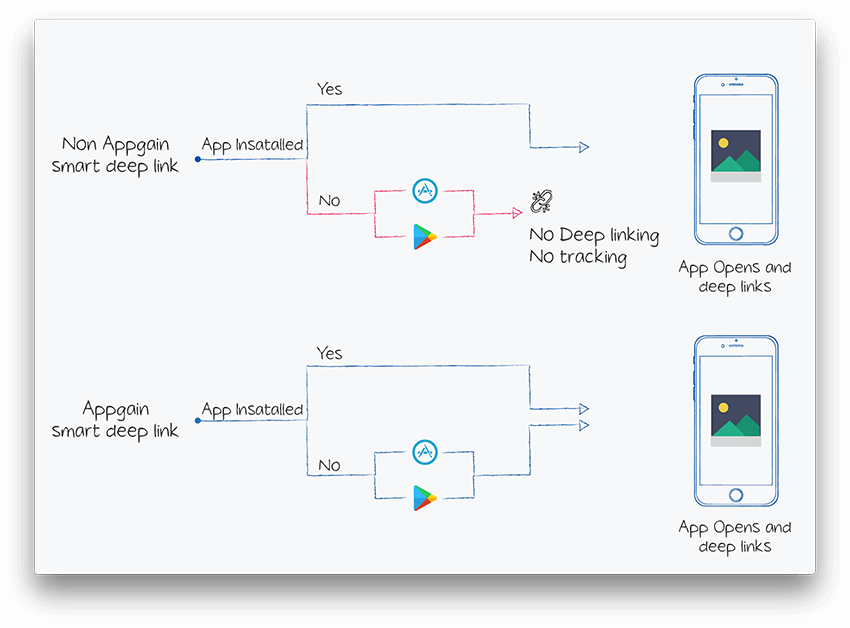
Deferred Deep Linking
After a new user has installed your app, our SDK will detect if the app was installed from a smart
deep link or not, if it's then our SDK will automatically route their flow to marketing campaign
desired location in the app (not just to the default home screen).
To achieve that, appgain.io SDK must be installed in the app, and the matching process must be
initiated
Appgain().matchLink();
The following data are returned on matching success :
| Returned Field | Description |
|---|---|
| smart_link_url | the URL of smart deep link used to open or install the App |
| smart_link_id | the Id of smart deep link used to open or install the App |
| smart_link_name | the Id of smart deep link used to open or install the App |
| match_type | how the device identification done , it could be basic(Digital fingerprinting) or advertising_id |
| extra_data | array of more data |
| extra_data.userId | user Id that was appended to smart link url on opening it phase |
| params | array of all parameters appended to smart link url , like SDL URL?utm_source=fb |
| smart_link_primary | primary redirection action |
You can return data by this code If you send params in your match deep link for example => https://app.appgain.io/s/XCplh?coupon=100 you can get coupon from params
Appgain().matchLink().then((result) {
      if (result != null) {
          result['extra_data'];
          result['extra_data']['params'];
          result['extra_data']['userId'];
          result['smart_link_primary'];
          result['smart_link_url'];
          result['smart_link_id'])
      }
    });
Marketing Automation
without Personalization
// required triggerPointName
await Appgain().fireAutomator(triggerPoint: 'YOUR TRIGGER POINT NAME');
with Personalization
- If you need personalization add data in map
- you can add your key and value that you want {key : value}
// required triggerPoint
var personalizationData = {
        'name': 'Jone',
        'cartName': 'Sports' ,
        'key', 'value'};
await Appgain().fireAutomatorWithPersonalization(
            triggerPoint: 'YOUR TRIGGER POINT NAME'  ,
            personalizationMap: personalizationData);
Revenue Tracking
you can add new Purchase Transactions object by using the following snippet :
/// required productName => String
/// required amount => double
/// required currency => String
await Appgain().addPurchase(
        productName: 'productName',
        amount: 100,
        currency: 'USD');
Custom Events Tracking
at your app whenever you want to log AppEvent, add the following snippet :
// required type
// optional action
// optional extras map
await Appgain().logEvent(
        type: 'google',
        extras: {
            'YOUR KEY 1': 'YOUR VALUE 1',
            'YOUR KEY 2': 'YOUR VALUE 2',},
        action: 'registration');
Set Custom User Attributes
at your app whenever you want to Set Custom User Attributes , add the following snippet :
var updatedData = {
    'userEmail': 'userEmail',
    'phone': 'phone',
    'updatedField1': 'value',
    'updatedField2': 'value'};
await Appgain().updateUser(data: updatedData);
Getting Appgain userId
// Getting userID
// Output  :  callback with userID
Appgain().getUserId();
Notification Channels
This Tutorial aims to teach the user how to add user Notification and messaging preferences in
channels such as SMS and Email
 //MARK: enableReceiveNotification
 //type (String) one of theses values ("appPush","SMS","email")
 await Appgain().enableReciveNotification(type: 'Notification Type');
🔧 Android Setup
Before proceeding, please make sure you are using the latest version of the plugin.
Gradle setup
- In Project-level build.gradle (
/build.gradle): - in section allproject --> repositories --> add
maven { url "https://sdk.appgain.io/repository/maven-releases/" }
- in section dependencies add --> add
classpath 'com.google.gms:google-services:latest_version'
- App-level build.gradle (project/app/build.gradle):
    dependencies {
      implementation platform('com.google.firebase:firebase-bom:31.0.1')
      implementation 'com.google.firebase:firebase-messaging'
      implementation 'io.appgain.sdk:appgain-android:5.0.1'
      }
- and if you are using a video player plugin add the following line
implementation 'com.google.android.exoplayer:exoplayer:2.19.1'
- and in the end of your file add the following line
apply plugin: 'com.google.gms.google-services'
- in defaultConfig Section add
    multiDexEnabled=true
    minSdkVersion 22
- go to https://firebase.google.com and log in with a Google Account.
- At Firebase Website, in the right corner click on GO TO CONSOLE and click on Add Project , then
give your Project a name. - Click on the settings icon next to Project Overview and then click on Project Settings
- Click on GENERAL > Add Firebase to your Android app icon then fill in fields with :
- Android package name : you can find it's value inside application Id value in app/build.gradle
- Debug signing certificate SHA- 1 ,you can get it from :
- Android studio > Gradle menu in (right toolbar of android studio)
- Click on app menu
- Click on android menu
- Click on android on signingReport task
- Get SHA1 from run menu
- Return to Firebase console click on REGISTER APP.
- Download google-services.json file.
- Add google-services.json file to app folder in your android project files
- Follow Firebase instructions.
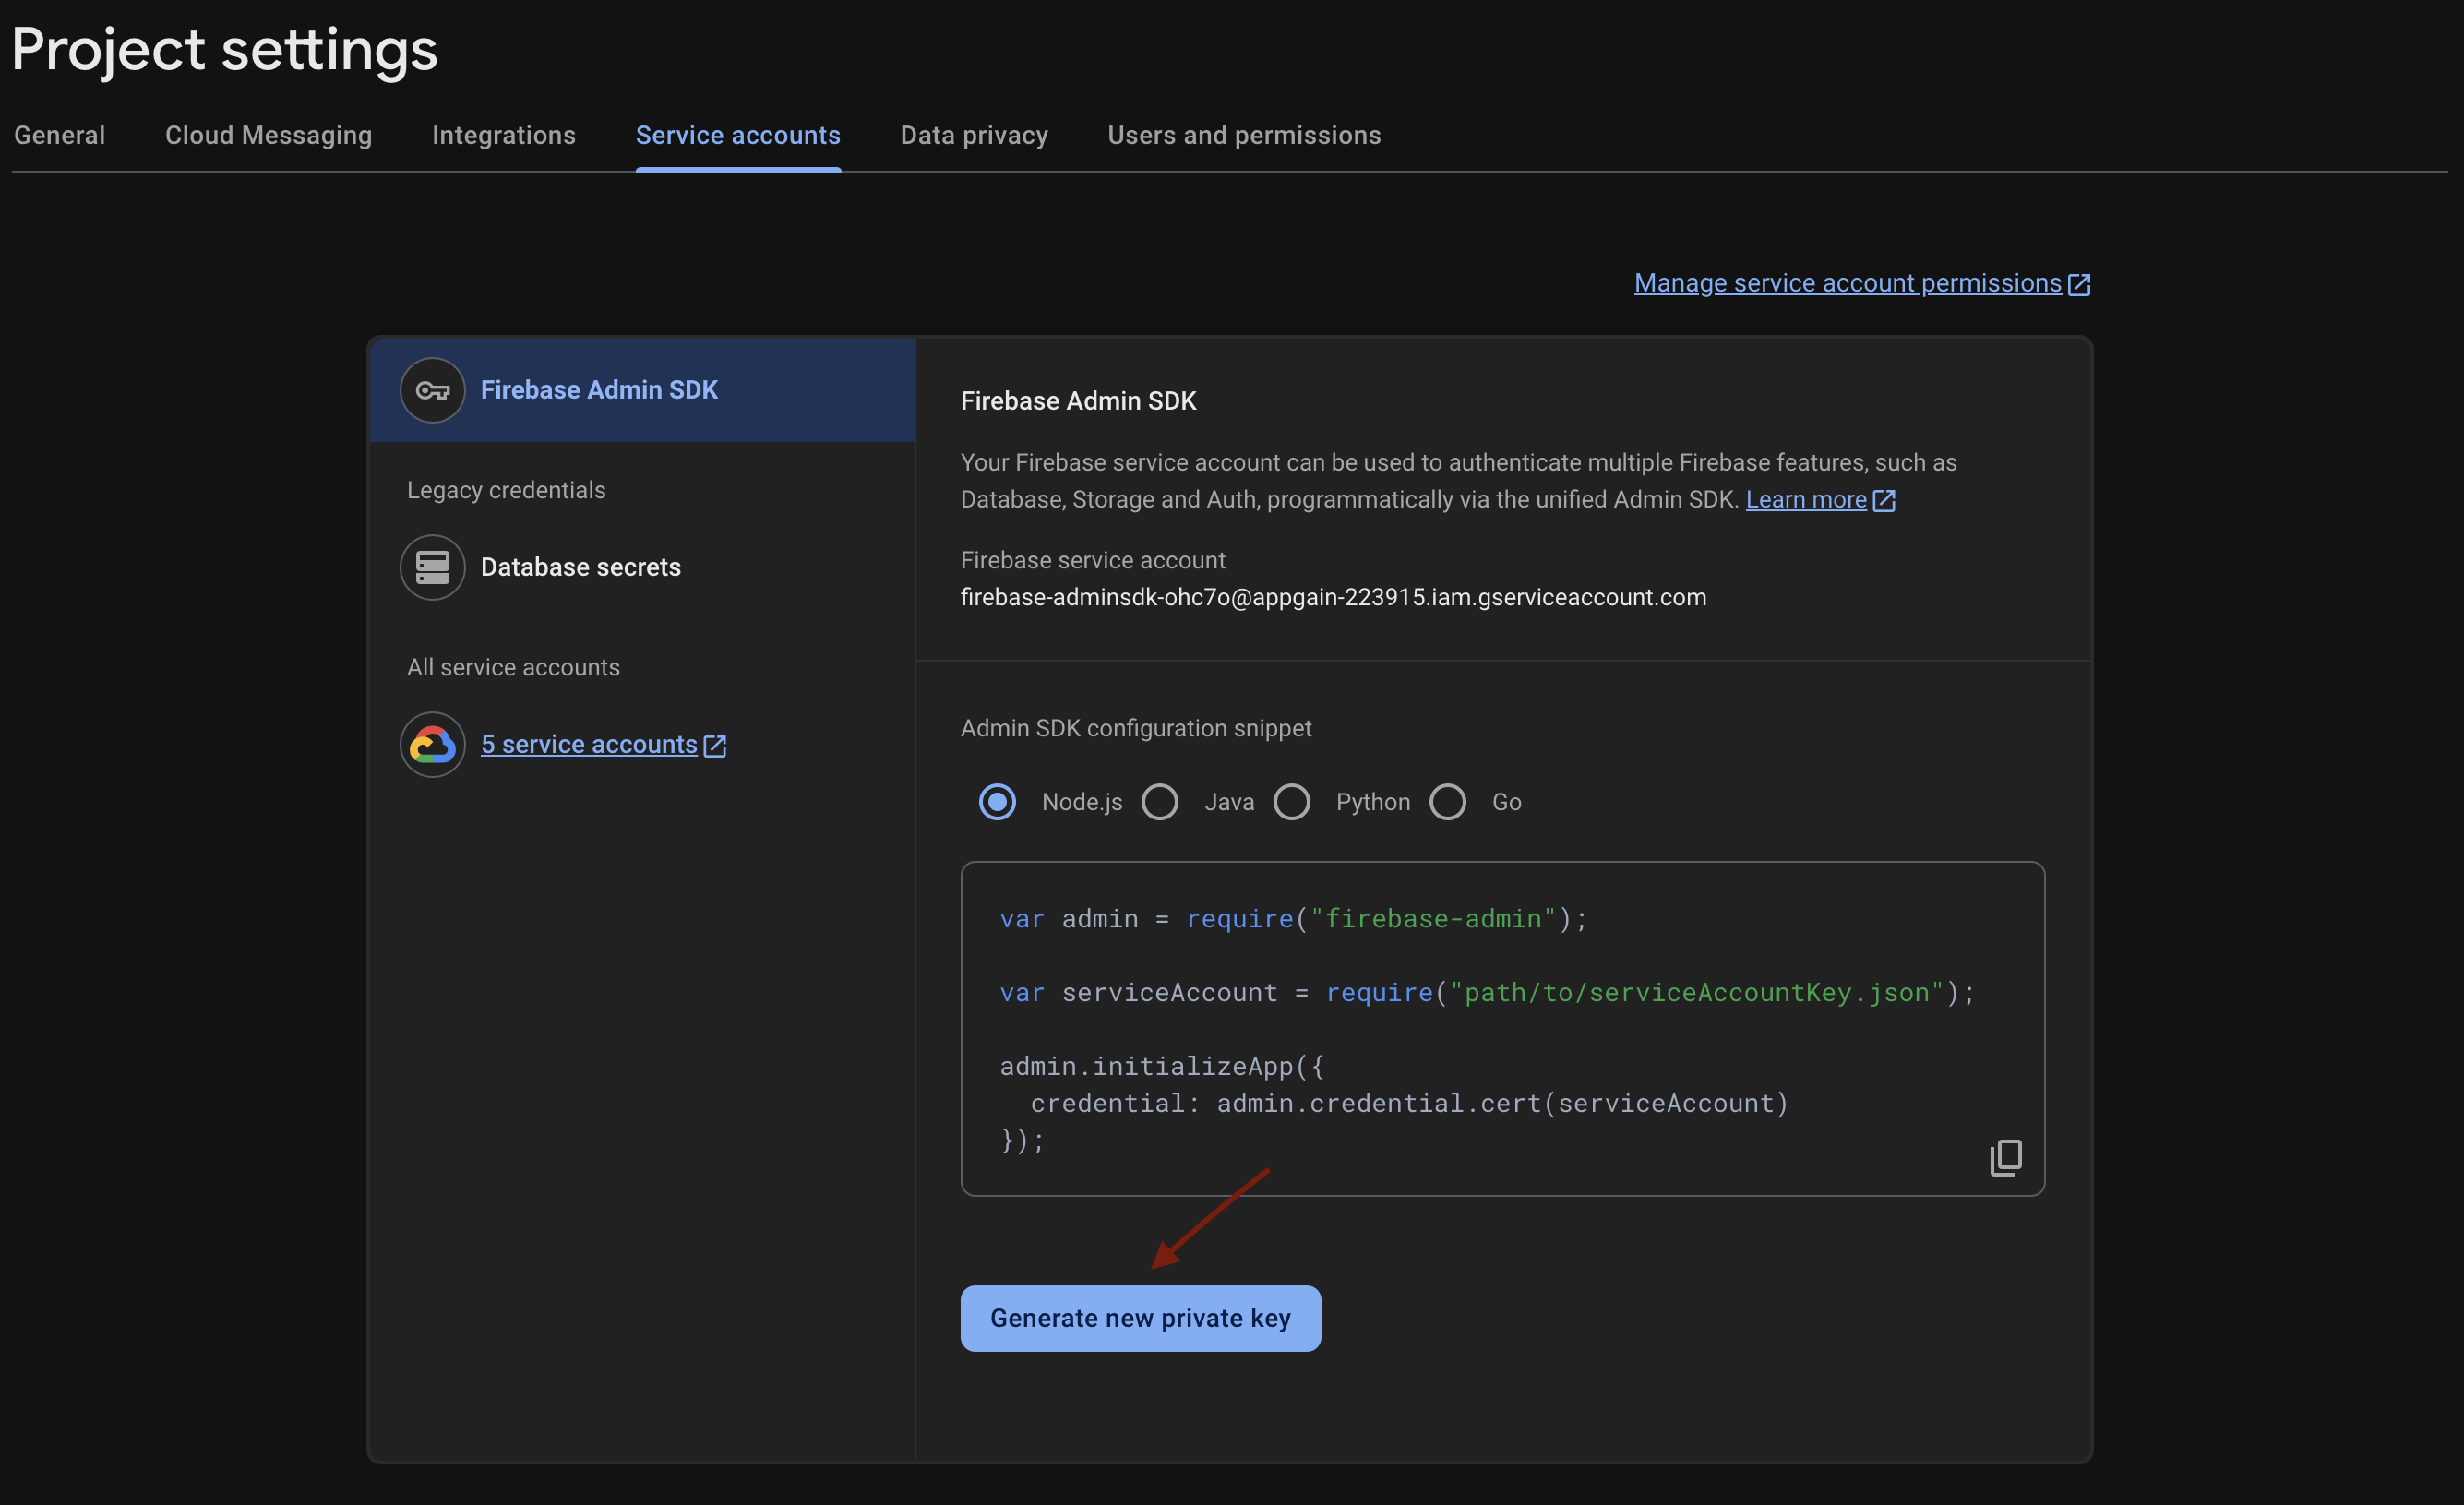
Push Notification setup
- Open the Firebase console, and go to your project.
-
Click the settings icon next to Project Overview and select Project Settings.
-
go to the Service Accounts tab in Project Settings, then click Generate new private key to download the JSON file.
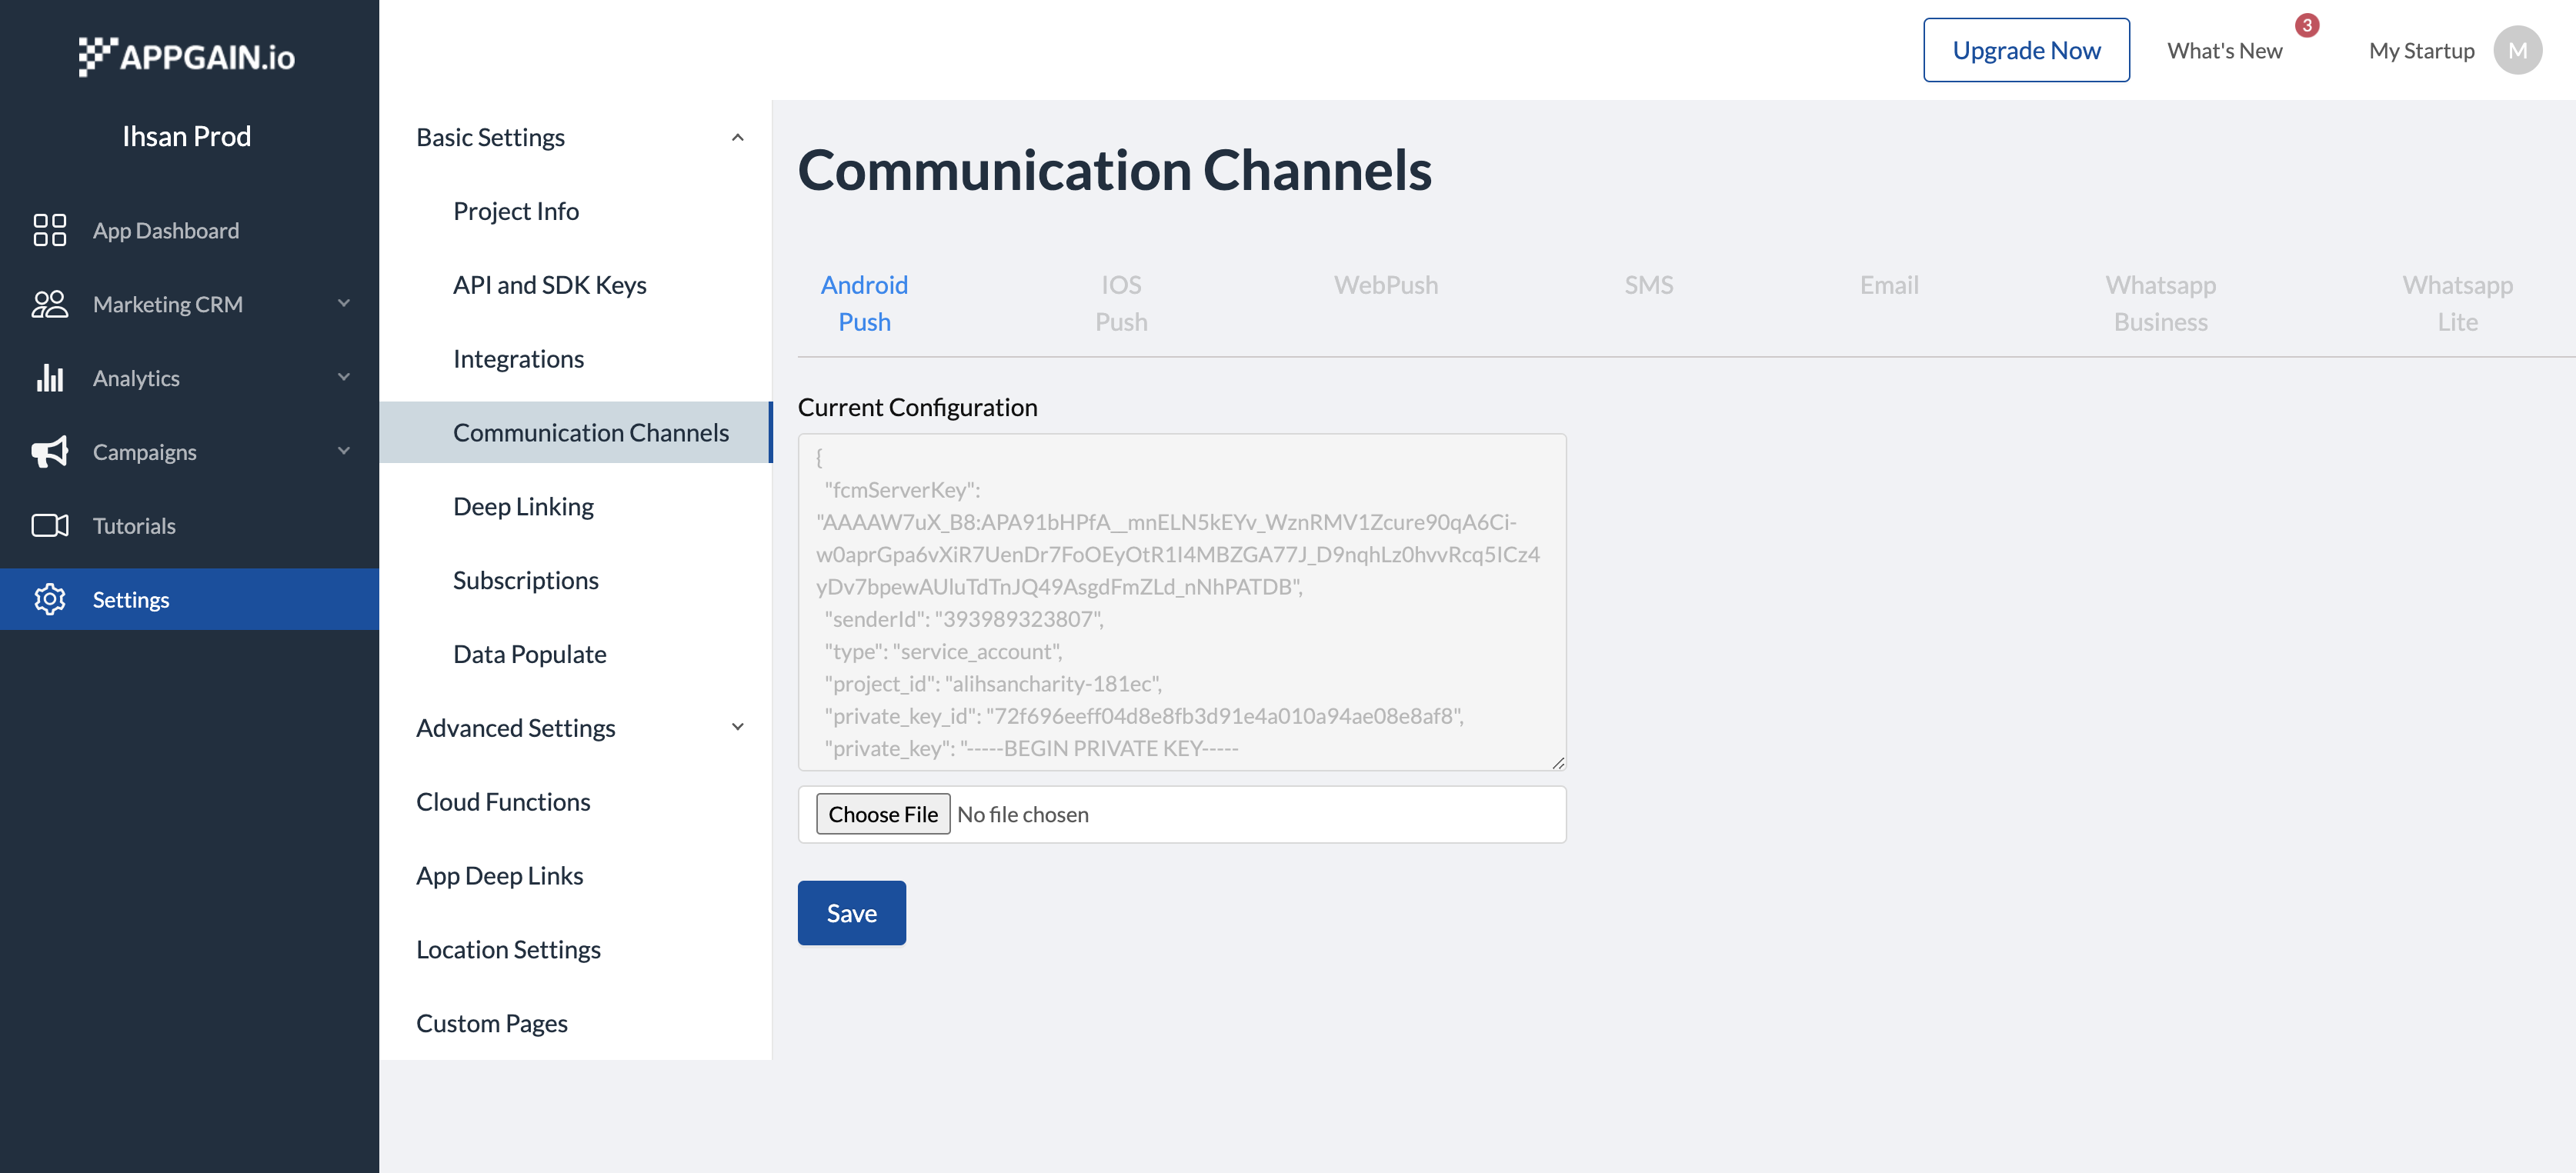
- Open the Appgain Dashboard
- Go to Setting > Communication Channels
- Navigate to the Android push tab
- Upload your JSON file
- if you are using proguard add this proguard rule to your proguard-rules.pro , add
keep class io.appgain.sdk.** {*;}
- Create a new class that extends from AppgainPushReceiver class
Class Name => PushReceiver
import android.content.Context;
import android.content.Intent;
import android.util.Log;
import android.widget.Toast;

import androidx.annotation.NonNull;

import io.appgain.sdk.controller.AppgainPushReceiver;
import io.appgain.sdk.model.push.ReceiveStatus;

public class PushReceiver extends AppgainPushReceiver {
     @Override protected void onReceive(Context context, ReceiveStatus receiveStatus, Intent intent) {
     Log.e("appgain", "test notification");
      }
}
- In your android application class, implement LifecycleObserver interface and add the following
lines
Class Name => AppController
package com.example.appgain_io_example;

import android.content.Context;

import androidx.lifecycle.Lifecycle;
import androidx.lifecycle.LifecycleObserver;
import androidx.lifecycle.OnLifecycleEvent;
import androidx.lifecycle.ProcessLifecycleOwner;
import androidx.multidex.MultiDex;
import androidx.multidex.MultiDexApplication;

import io.appgain.sdk.controller.Appgain;
import io.appgain.sdk.model.User;
import io.appgain.sdk.util.Config;


/**
 * Created by developers@appgain.io on 12/28/2021. */
public class AppController extends MultiDexApplication implements LifecycleObserver {

  public static final boolean DEBUG_MODE =false;
    private static AppController mInstance;
    String TAG = "AppController";
    public static boolean DIALOG_CANCELLABLE = true;


    @Override
    public void onCreate() {
  super.onCreate();
        mInstance = this;
        ProcessLifecycleOwner.get().getLifecycle().addObserver(this);
        Appgain.enableLog();
    }

  @OnLifecycleEvent(Lifecycle.Event.ON_STOP)
  void onAppBackgrounded() {
  Appgain.onAppBackgrounded();
    }

  @OnLifecycleEvent(Lifecycle.Event.ON_START)
  void onAppForegrounded() {
  Appgain.onAppForegrounded();
    }

  @Override
    protected void attachBaseContext(Context base) {
  super.attachBaseContext(base);
        MultiDex.install(this);
    }


  public static synchronized AppController getInstance() {
  return mInstance;
    }

}
- Open manifest.xml file and add the following lines:
- In "-application-" section add this line
android:name=".AppController"
- also add
      <receiver
           android:name=".PushReceiver"
          android:exported="false">
          <intent-filter>
             <action android:name="com.parse.push.intent.RECEIVE" />
             <action android:name="com.parse.push.intent.DELETE" />
             <action android:name="com.parse.push.intent.OPEN" />
         </intent-filter>
    </receiver>
    <service android:name="io.appgain.sdk.controller.AppgainMessagingService"
     android:exported="false">
         <intent-filter>
               <action android:name="com.google.firebase.MESSAGING_EVENT" />
         </intent-filter>
    </service>
ProGuard rules For appgain_sdk , the ProGuard rules are automatically provided by the GSON.
Before creating the release build of your app (which is the default setting when building an APK or app bundle) you will need to customise your ProGuard configuration file. Rules specific to the GSON dependency being used by the plugin will need to be added (proguard-rules.pro).
-ignorewarnings
-keep class * {
    public private *;
}
-keep class io.appgain.sdk.** {*;}
    buildTypes {
        release {
            minifyEnabled false
            shrinkResources false
            proguardFiles getDefaultProguardFile('proguard-android.txt'), 'proguard-rules.pro'

        }
    }
🔧 iOS setup
General setup
1- Add appgain pod to your generated project from flutter.
pod 'Appgain'

Handling notifications
AppDelegate+Notifications+Extension.swift
//
//  AppDelegate+Extension.swift
//  PragueNow
//
import Foundation
import UIKit

import UserNotificationsUI
import UserNotifications
import Appgain

extension AppDelegate {


    override func application(_ application: UIApplication, didRegisterForRemoteNotificationsWithDeviceToken deviceToken: Data) {

          print("DEVICE TOKEN = \(deviceToken)")
          print("Device token string ==> \(deviceToken.base64EncodedString())")
          Appgain.registerDevice(withToken: deviceToken)
          let tokenParts = deviceToken.map { data in String(format: "%02.2hhx", data) }
          let token = tokenParts.joined()
          print("Device Token: \(token)")

      }


    func  registerForRemoteNotification(){
        if #available(iOS 10.0, *) {
            // For iOS 10 display notification (sent via APNS)
            UNUserNotificationCenter.current().delegate = self
            let authOptions: UNAuthorizationOptions = [.alert, .badge, .sound]
            UNUserNotificationCenter.current().requestAuthorization(
                options: authOptions,
                completionHandler: {_, _ in })
        } else {
            let settings: UIUserNotificationSettings =
                UIUserNotificationSettings(types: [.alert, .badge, .sound], categories: nil)
            DispatchQueue.main.async {
                UIApplication.shared.registerUserNotificationSettings(settings)
            }
        }
        DispatchQueue.main.async {
            UIApplication.shared.registerForRemoteNotifications()
        }
    }


    override func userNotificationCenter(_ center: UNUserNotificationCenter, didReceive response: UNNotificationResponse, withCompletionHandler completionHandler: @escaping () -> Void) {
        UIApplication.shared.applicationIconBadgeNumber = 0

        if let url = response.notification.request.content.userInfo["url"] as? String{
            switch UIApplication.shared.applicationState {
            case .background, .inactive:
                    // background

                let deadlineTime = DispatchTime.now() + .seconds(😎
                DispatchQueue.main.asyncAfter(deadline: deadlineTime) {
                    print("test")

                if  let urll = URL(string: url){

                    UIApplication.shared.open(urll) { (result) in
                        if result {
                           // The URL was delivered successfully!
                        }
                    }
                }
            }
                break
                case .active:
                    // foreground
                    if  let urll = URL(string: url){

                        UIApplication.shared.open(urll) { (result) in
                            if result {
                               // The URL was delivered successfully!
                            }
                        }
                    }

                    break
                default:
                    break
            }

        }


        Appgain.recordPushStatus(NotificationStatus.opened(), userInfo: response.notification.request.content.userInfo)

    }

    override func userNotificationCenter(_ center: UNUserNotificationCenter, willPresent notification: UNNotification, withCompletionHandler completionHandler: @escaping (UNNotificationPresentationOptions) -> Void) {
        UIApplication.shared.applicationIconBadgeNumber = UIApplication.shared.applicationIconBadgeNumber + 1
        completionHandler([.alert, .badge, .sound])
        Appgain.recordPushStatus(NotificationStatus.conversion(), userInfo: notification.request.content.userInfo)

    }

    override func application(_ application: UIApplication, didReceiveRemoteNotification userInfo: [AnyHashable : Any], fetchCompletionHandler completionHandler: @escaping (UIBackgroundFetchResult) -> Void) {

        UIApplication.shared.applicationIconBadgeNumber = 0

        if let url = userInfo["url"] as? String{
            switch UIApplication.shared.applicationState {
            case .background, .inactive:
                    // background

                let deadlineTime = DispatchTime.now() + .seconds(😎
                DispatchQueue.main.asyncAfter(deadline: deadlineTime) {
                    print("test")

                if  let urll = URL(string: url){

                    UIApplication.shared.open(urll) { (result) in
                        if result {
                           // The URL was delivered successfully!
                        }
                    }
                }
            }
                break
                case .active:
                    // foreground
                    if  let urll = URL(string: url){

                        UIApplication.shared.open(urll) { (result) in
                            if result {
                               // The URL was delivered successfully!
                            }
                        }
                    }

                    break
                default:
                    break
            }

        }
        Appgain.handlePush(userInfo, for: application)

    }


    override func application(_ application: UIApplication, didReceiveRemoteNotification userInfo: [AnyHashable : Any]) {
        UIApplication.shared.applicationIconBadgeNumber = 0
        //silent notification for update content

        Appgain.handlePush(userInfo, for: application)
    }


}
3- How we start with this code
- Inside AppDelegate.swift
@objc class AppDelegate: FlutterAppDelegate {
  override func application(
    _ application: UIApplication,
    didFinishLaunchingWithOptions launchOptions: [UIApplication.LaunchOptionsKey: Any]?
  ) -> Bool {
    GeneratedPluginRegistrant.register(with: self)
    //ios-all-supported-versions-requesting-notification-permissions
      registerForRemoteNotification()
    return super.application(application, didFinishLaunchingWithOptions: launchOptions)
  }
}
- Allow the application to access the network by adding this in the plist file.
<key>NSAppTransportSecurity</key>

<dict>

<key>NSAllowsArbitraryLoads</key>

<true/>

</dict>
Add Appgain Rich Notification
this integration is optional , if not done then Video,HTML,GIF Push will not work
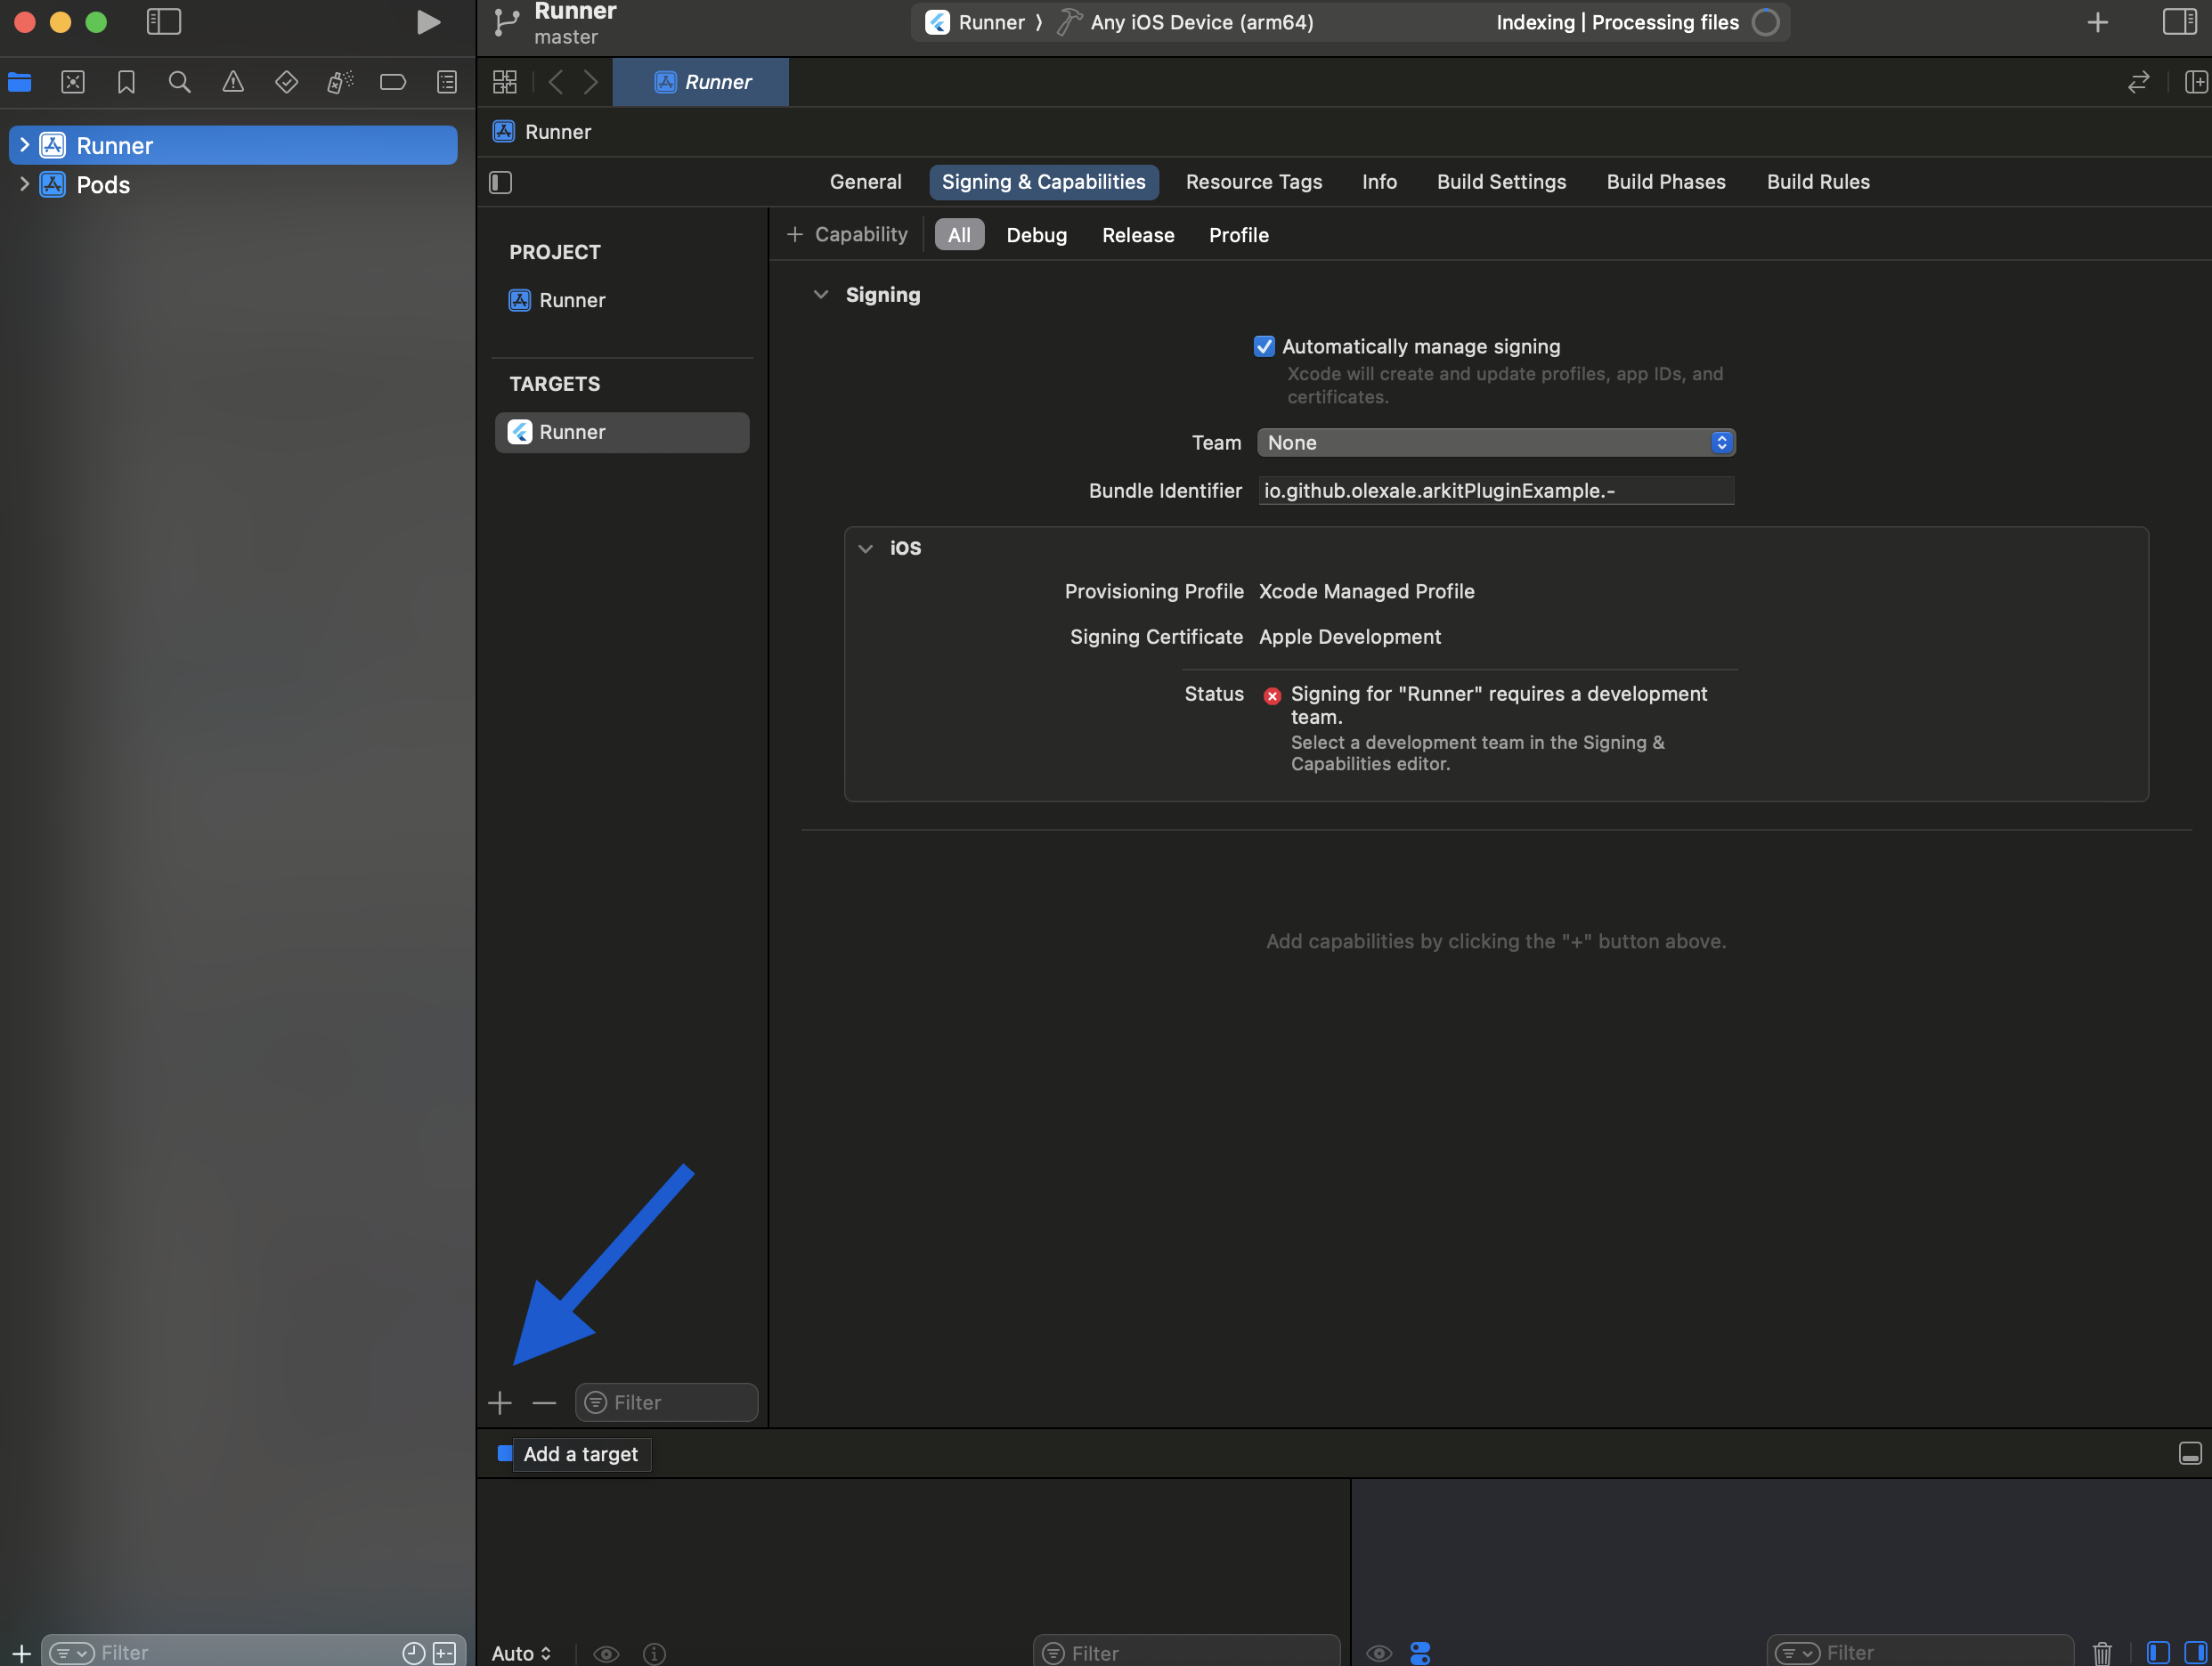
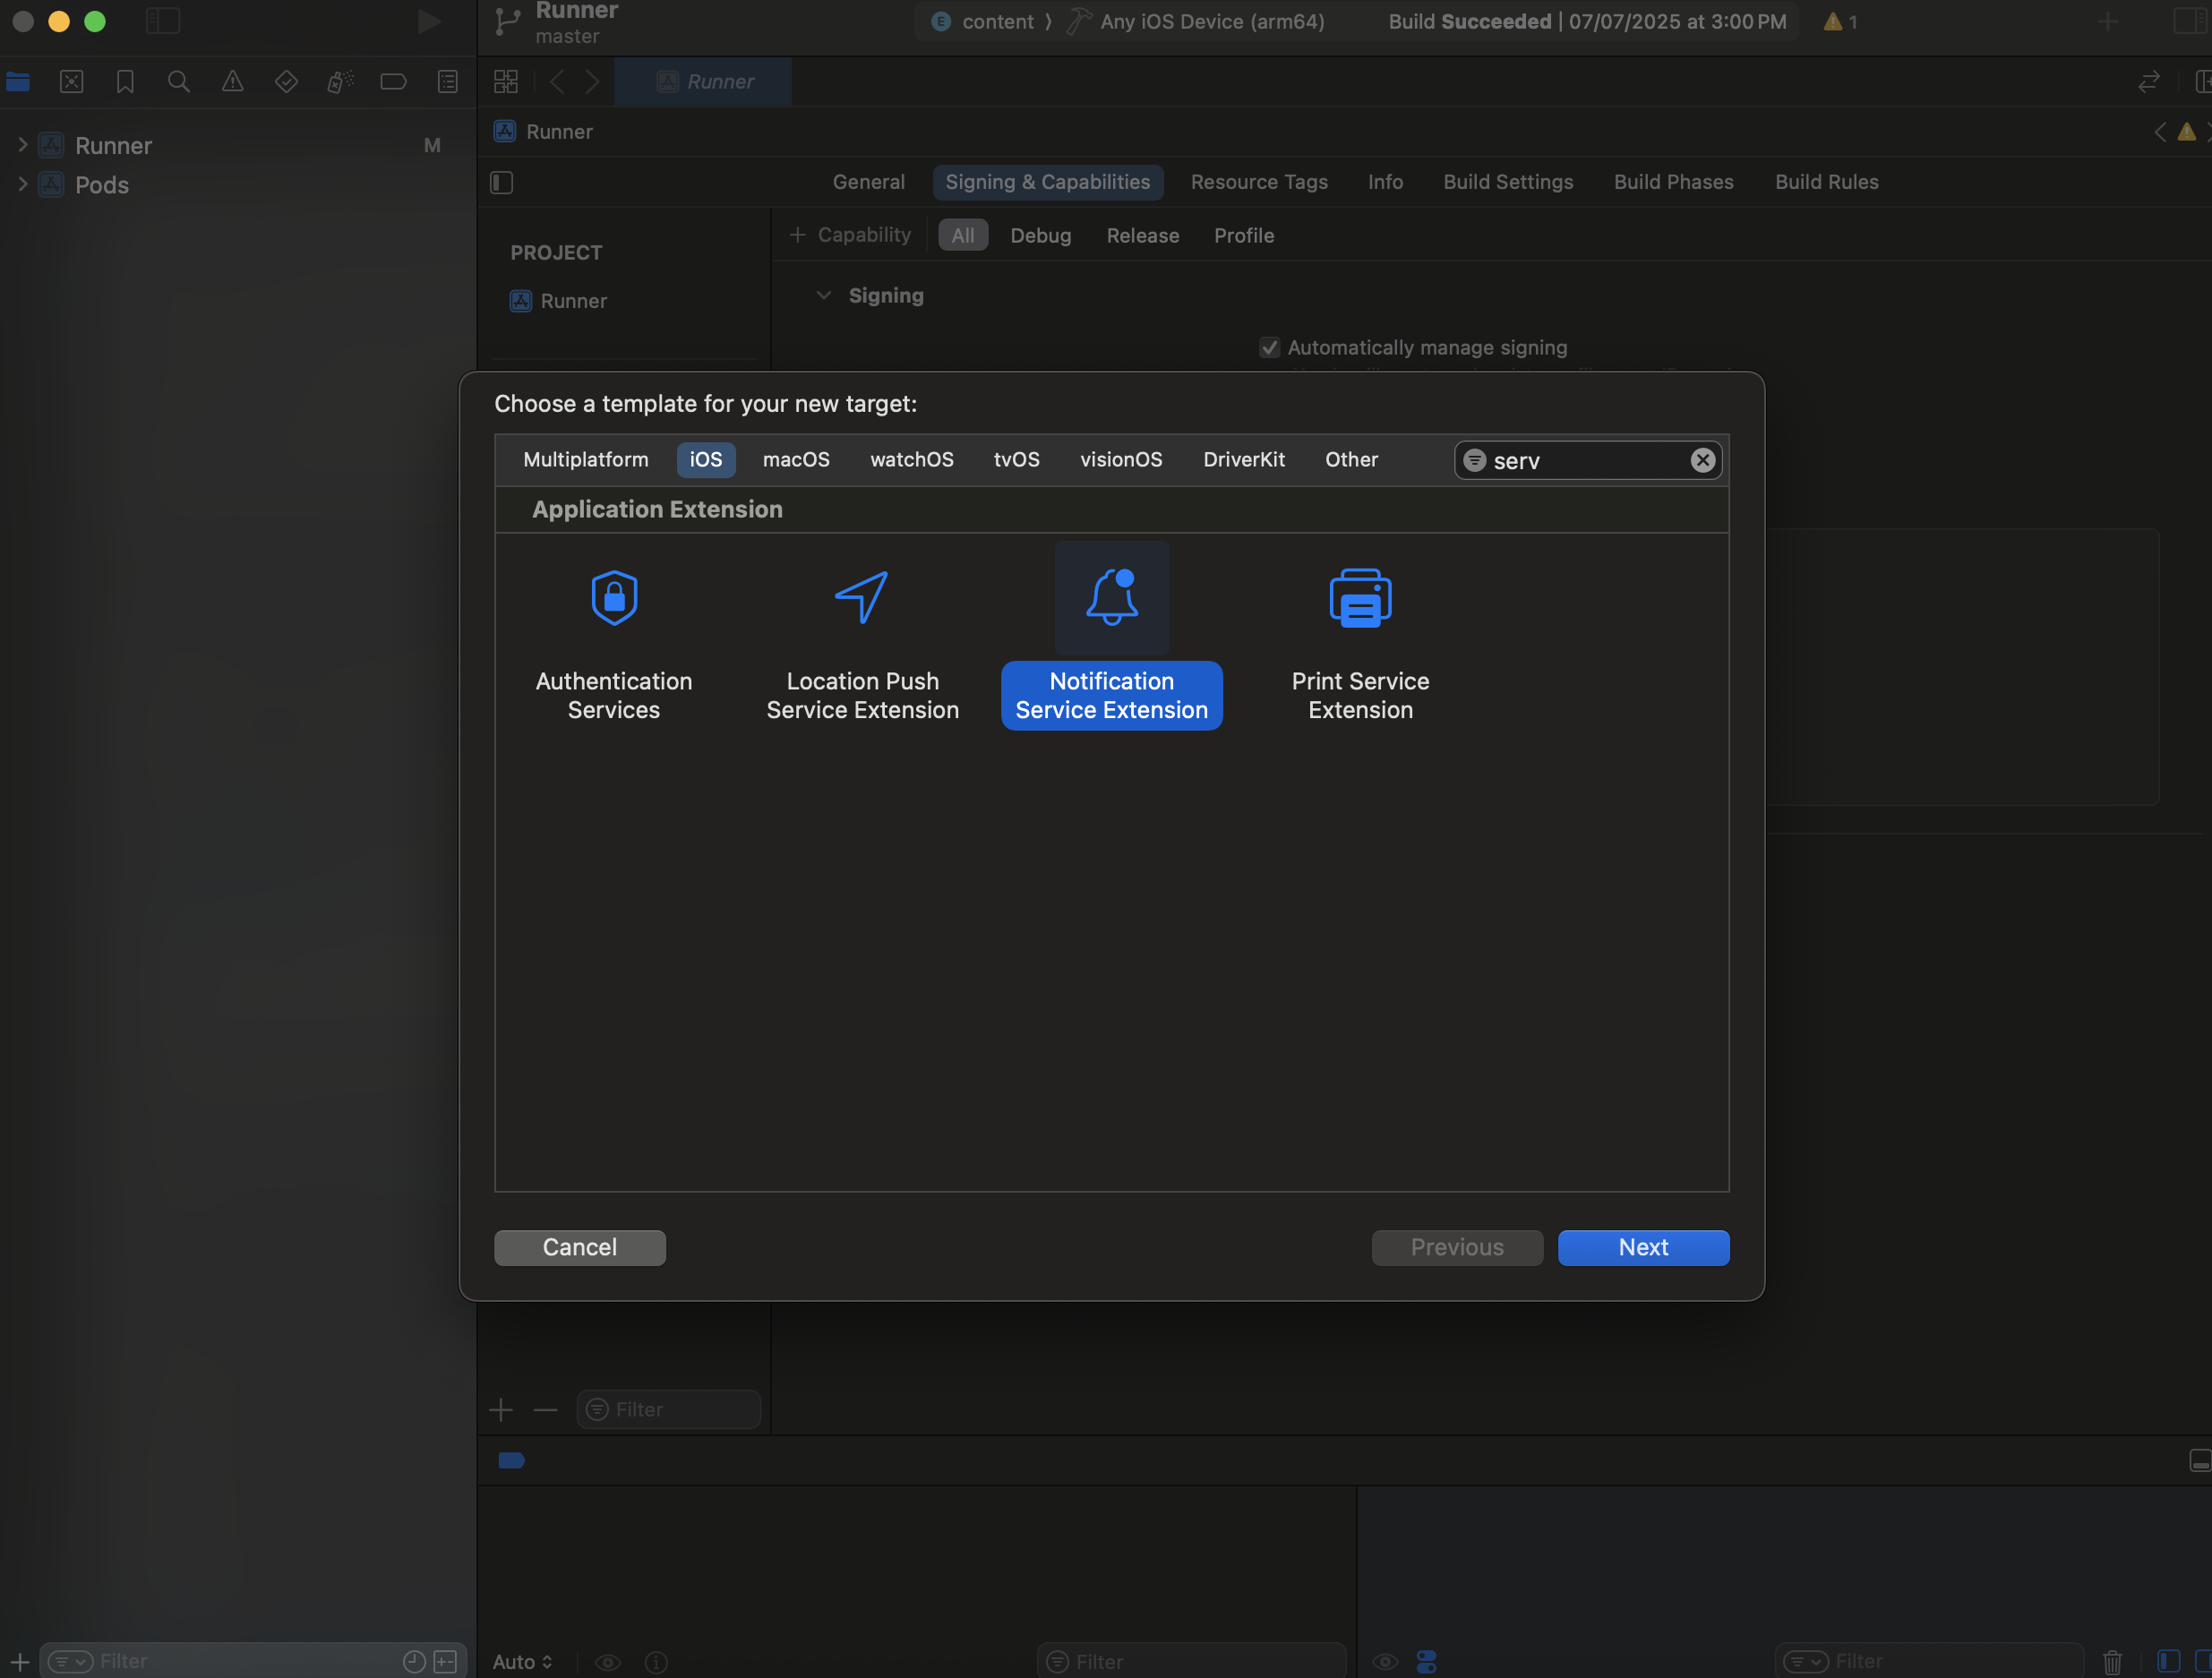
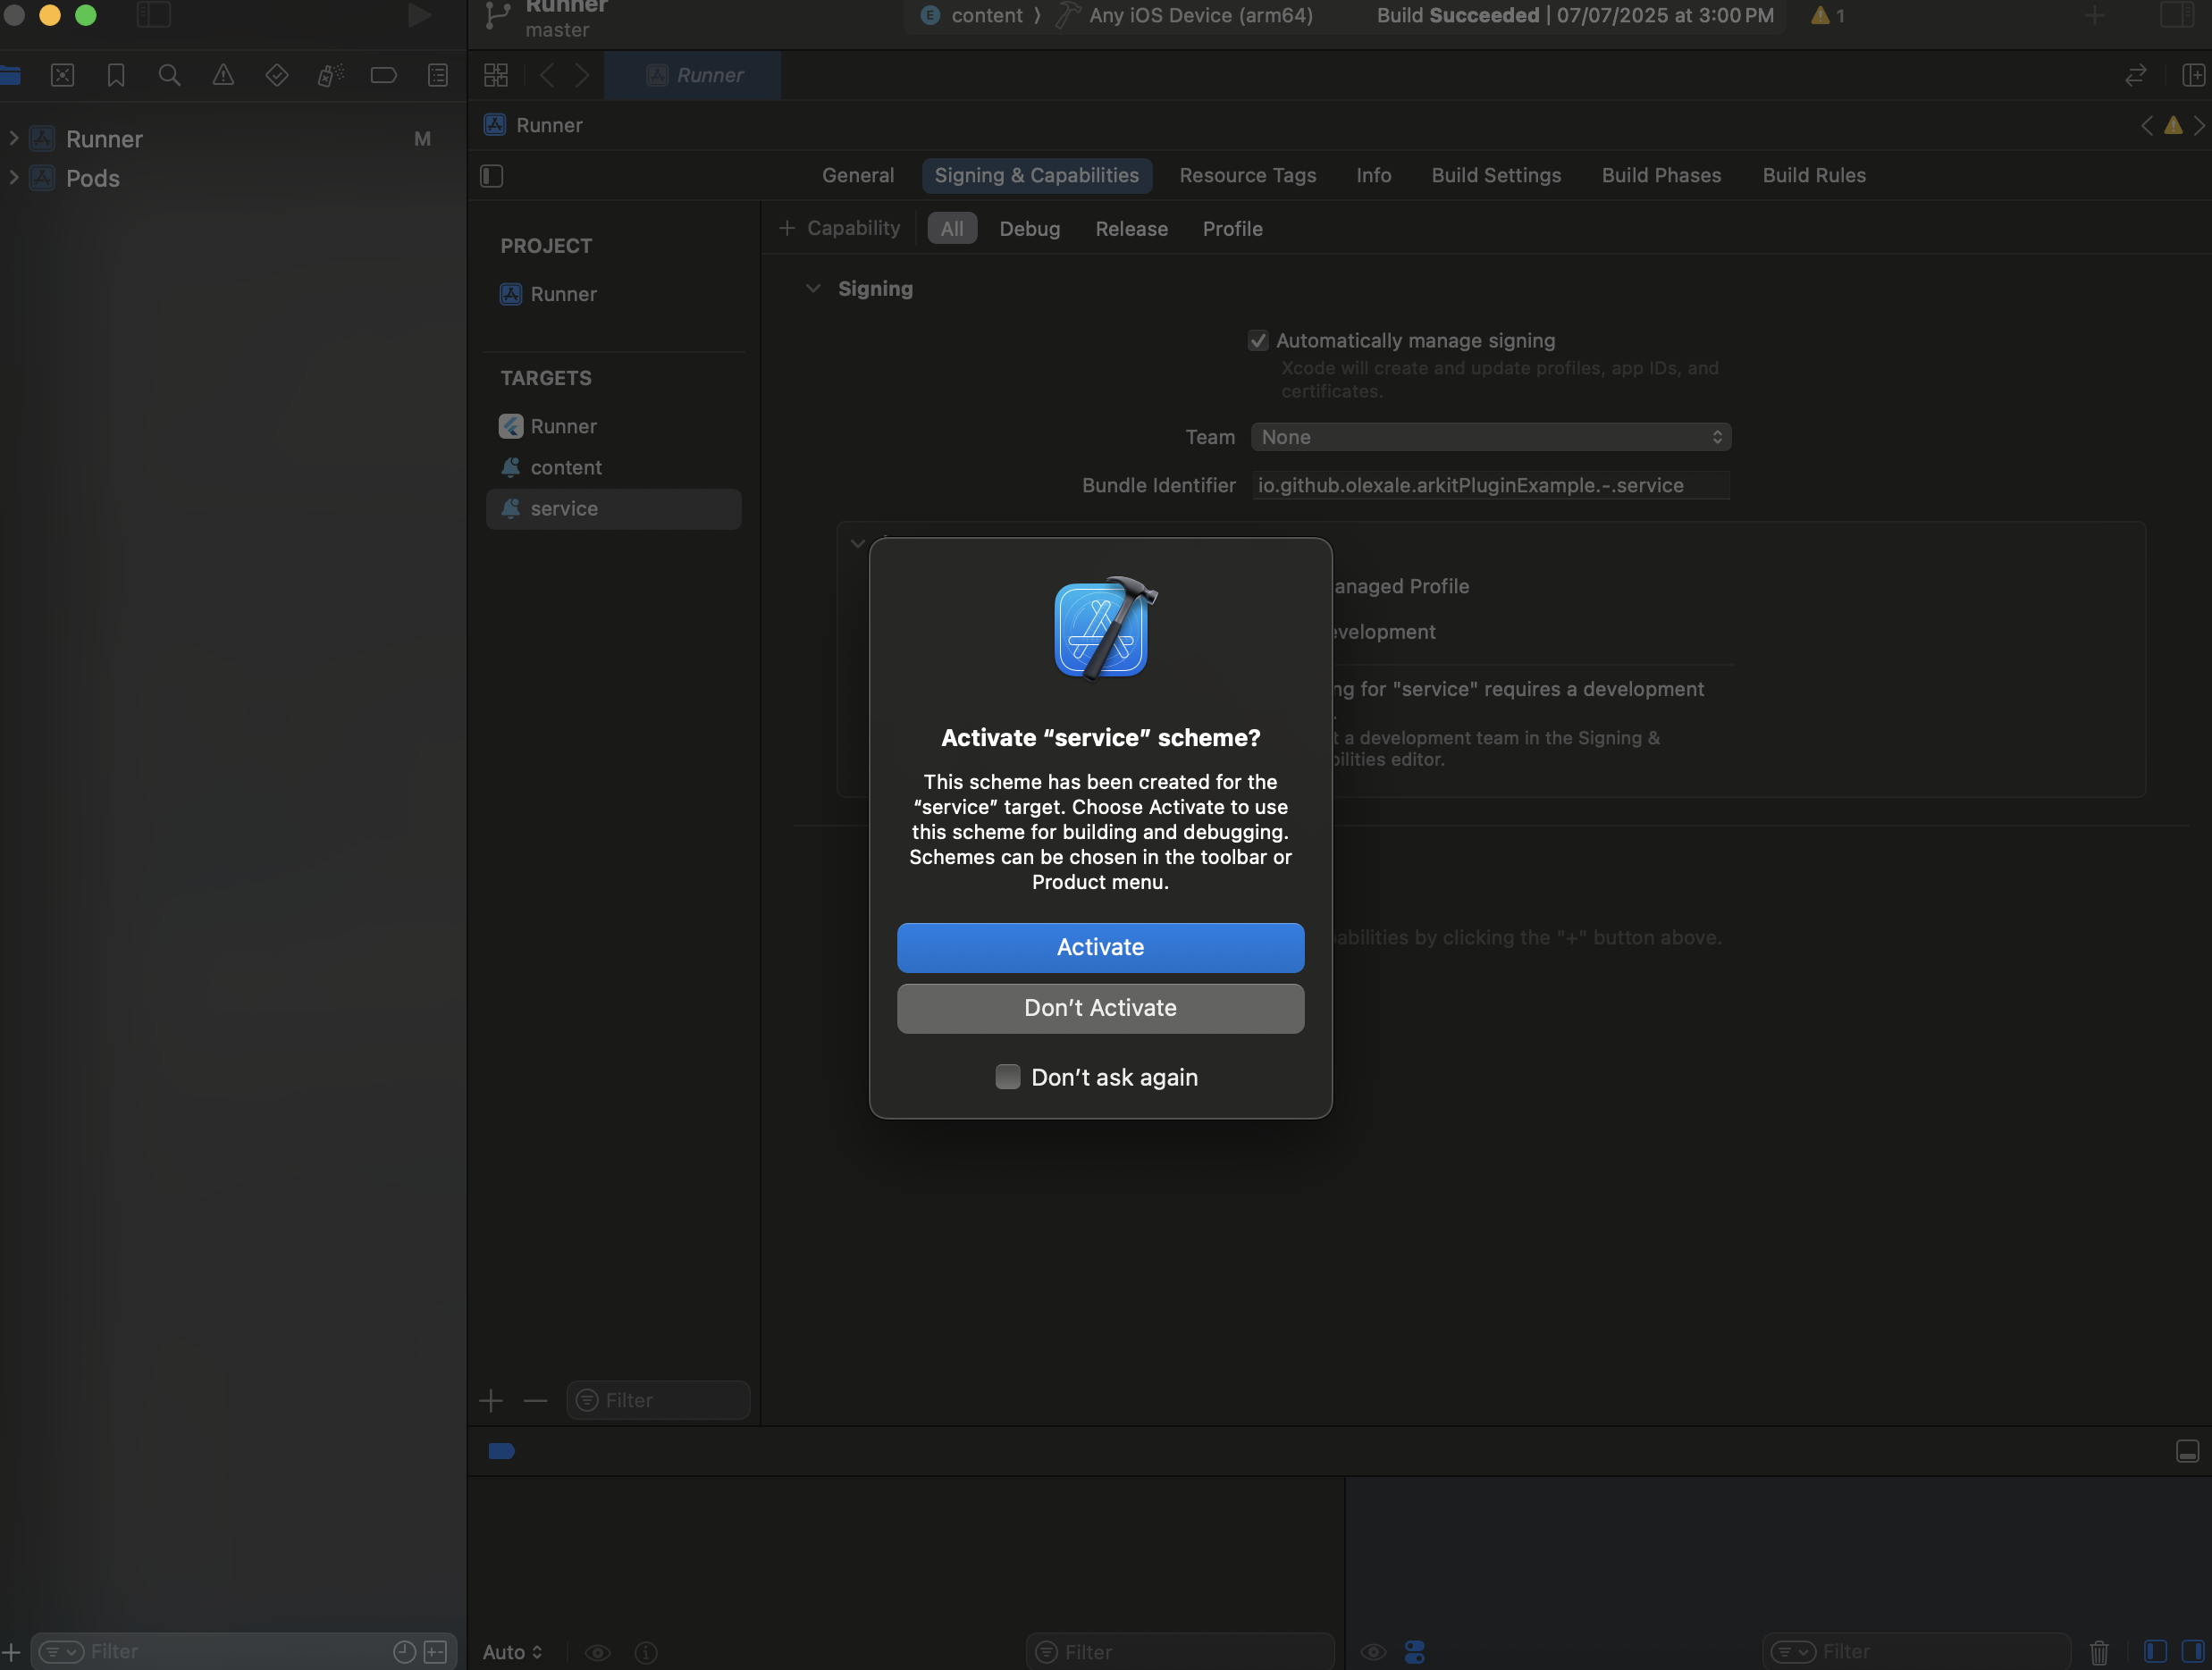
- Add Notification Service Extension : go to your xcodeproj in xcode ---> Add Target -->
Notification Service Extension >Next > Finish > Activate Scheme Content
Go to your service target folder --> info.plist , and add below content
<?xml version="1.0" encoding="UTF-8"?>
<!DOCTYPE plist PUBLIC "-//Apple//DTD PLIST 1.0//EN" "http://www.apple.com/DTDs/PropertyList-1.0.dtd">
<plist version="1.0">
<dict>
    <key>NSExtension</key>
  <dict>
      <key>NSExtensionPointIdentifier</key>
      <string>com.apple.usernotifications.service</string>
      <key>NSExtensionPrincipalClass</key>
      <string>NotificationService</string>
      <key>UNNotificationExtensionCategory</key>
      <string>rich-apns</string>
  </dict>
</dict>
</plist>
also need to Go to your service target folder --> NotificationService , and add below content
//  NotificationService.swift
//  service

import UserNotifications
import Appgain_Rich

class NotificationService: UNNotificationServiceExtension {

  var contentHandler: ((UNNotificationContent) -> Void)?
  var bestAttemptContent: UNMutableNotificationContent?

  override func didReceive(_ request: UNNotificationRequest, withContentHandler contentHandler: @escaping (UNNotificationContent) -> Void) {
      self.contentHandler = contentHandler
      bestAttemptContent = (request.content.mutableCopy() as? UNMutableNotificationContent)

      if let bestAttemptContent = bestAttemptContent {
          // Modify the notification content here...
          bestAttemptContent.title = "\(bestAttemptContent.title) [modified]"
          AppgainRich.didReceive(request, andNotificationContent: bestAttemptContent, withContentHandler: contentHandler)

          contentHandler(bestAttemptContent)
      }
  }

  override func serviceExtensionTimeWillExpire() {
      // Called just before the extension will be terminated by the system.
      // Use this as an opportunity to deliver your "best attempt" at modified content, otherwise the original push payload will be used.
      if let contentHandler = contentHandler, let bestAttemptContent =  bestAttemptContent {
          contentHandler(bestAttemptContent)
      }
  }

}
-
Add Notification Content Extension: Add Target --> Notification Content Extension >Next > Finish > Activate Scheme Content
-
Configure category for your notification extension: Go to your Content target folder --> info.plist , and add below content
<?xml version="1.0" encoding="UTF-8"?>
<!DOCTYPE plist PUBLIC "-//Apple//DTD PLIST 1.0//EN" "http://www.apple.com/DTDs/PropertyList-1.0.dtd">
<plist version="1.0">
<dict>
    <key>NSExtension</key>
    <dict>
        <key>NSExtensionAttributes</key>
        <dict>
            <key>UNNotificationExtensionCategory</key>
            <array>
                <string>rich-apns</string>
            </array>
            <key>UNNotificationExtensionInitialContentSizeRatio</key>
            <real>1</real>
            <key>UNNotificationExtensionUserInteractionEnabled</key>
            <true/>
        </dict>
        <key>NSExtensionMainStoryboard</key>
        <string>MainInterface</string>
        <key>NSExtensionPointIdentifier</key>
        <string>com.apple.usernotifications.content-extension</string>
    </dict>
</dict>
</plist>
- also need to modify MainInterface.storyboard change NotificationViewController window size to be height 300 and remove all outlet form it Go to your Content target folder --> MainInterFace , and add below content
<?xml version="1.0" encoding="UTF-8"?>
<document type="com.apple.InterfaceBuilder3.CocoaTouch.Storyboard.XIB" version="3.0" toolsVersion="19455" targetRuntime="iOS.CocoaTouch" propertyAccessControl="none" useAutolayout="YES" useTraitCollections="YES" useSafeAreas="YES" colorMatched="YES" initialViewController="M4Y-Lb-cyx">
    <device id="retina6_1" orientation="portrait" appearance="light"/>
    <dependencies>
        <plugIn identifier="com.apple.InterfaceBuilder.IBCocoaTouchPlugin" version="19454"/>
        <capability name="Safe area layout guides" minToolsVersion="9.0"/>
        <capability name="documents saved in the Xcode 8 format" minToolsVersion="8.0"/>
    </dependencies>
    <scenes>
        <!--Notification View Controller-->
        <scene sceneID="cwh-vc-ff4">
            <objects>
                <viewController id="M4Y-Lb-cyx" userLabel="Notification View Controller" customClass="NotificationViewController" customModule="content" customModuleProvider="target" sceneMemberID="viewController">
                    <view key="view" contentMode="scaleToFill" simulatedAppContext="notificationCenter" id="S3S-Oj-5AN">
                        <rect key="frame" x="0.0" y="0.0" width="320" height="300"/>
                        <autoresizingMask key="autoresizingMask" widthSizable="YES" heightSizable="YES"/>
                        <viewLayoutGuide key="safeArea" id="2BE-c3-nQJ"/>
                        <color key="backgroundColor" white="1" alpha="1" colorSpace="custom" customColorSpace="genericGamma22GrayColorSpace"/>
                    </view>
                    <extendedEdge key="edgesForExtendedLayout"/>
                    <freeformSimulatedSizeMetrics key="simulatedDestinationMetrics"/>
                    <size key="freeformSize" width="320" height="300"/>
                </viewController>
                <placeholder placeholderIdentifier="IBFirstResponder" id="vXp-U4-Rya" userLabel="First Responder" sceneMemberID="firstResponder"/>
            </objects>
            <point key="canvasLocation" x="91" y="79"/>
        </scene>
    </scenes>
</document>
Go to your Content target folder --> NotificationViewController , and add below content
import UIKit
import UserNotifications
import UserNotificationsUI
import Appgain_Rich

class NotificationViewController: UIViewController, UNNotificationContentExtension {

  @IBOutlet var label: UILabel?

  override func viewDidLoad() {
      super.viewDidLoad()
      // Do any required interface initialization here.
  }

  func didReceive(_ notification: UNNotification) {
      AppgainRich.didReceive(notification, in: self)
  }

}
- Install pods open you workspace pod file add the following to it
target ‘#your content target #’

pod 'Appgain-Rich'

end
target ‘#your service target #’

pod 'Appgain-Rich'

end

Apple IDFA Tracking Setup
ATTrackingManager.requestTrackingAuthorizationWithCompletionHandler: This function is advised on the first app launch to ensure the value is captured. The prompt only shows if the app is a fresh install and the user consent status is unknown. For the majority of applications, only enable tracking if the status is authorized on becoming active (new in iOS 14), as below:
- Allow the application to access the IDFA by adding this in the plist file.
<key>NSUserTrackingUsageDescription</key>
<string>Privacy of our platform users is extremely important and we at Customer App are committed to protecting the same. Your personal information is collected  only to understand your journey within the platform and as a part of the search process.</string>
- add following code in your AppDelegate file
import AppTrackingTransparency

@objc class AppDelegate: FlutterAppDelegate {
  override func application(
    _ application: UIApplication,
 func applicationDidBecomeActive(_ application: UIApplication) {
        if #available(iOS 14, *) {
            ATTrackingManager.requestTrackingAuthorization { status in
                switch status {
                    case .authorized:
                        print("enable tracking")
                    case .denied:
                        print("disable tracking")
                    default:
                        print("disable tracking")
                }
            }
        }
    }
}
-
Setup GuideFor more info about all the methods in the Appgain SDK. please, refer to our native guides for ios
Finally You Can Use Appgain SDKTestApp to Test Appgain Features Before Integrate Your App with Appgain