title: iOS SDK Integration Guide description: Complete guide to integrate Appgain.io SDK into your iOS app for push notifications, deep linking, and marketing automation keywords: iOS SDK, Appgain.io, push notifications, deep linking, marketing automation, Swift, Objective-C tags: [iOS, SDK, integration, push notifications, deep linking, Swift] author: Appgain.io Team date: 2024-01-01
Getting Started
This Tutorial aims to teach the user how to integrate his iOs app with Appgain.io cloud using appgain.io SDK and how to use the appgain.io products.
📚 Related Documentation
- *Setup Guides*: New Project Setup | Dashboard Configuration
- *Push Setup*: iOS Push Certificate
- *Other SDKs*: Android SDK | Flutter SDK | Web SDK
- *Marketing*: Push Notifications | Marketing Automation
Required For Setup
-
Xcode.
-
Appgain.io Account if you do not already have one
-
Generate iOS Push Credentials
Generate P12 Credentials
Before Setting up the iOs SDK, you must generate the appropriate credentials for the platform you are releasing on:
Installation
- Install SDK throw swift package Manager
1- In Xcode use File » swift Packages » Add Package Dependency… to add a new dependency:
2- add appgain url https://github.com/appgain/appgain-SDK-iOs.git
3- Leave the default version settings - the library will be updated until the next major release:
4- Only add the Appgain product to the app target (Appgain-rich also includes an optional integration for your rich remote notification target)
5- The library will be set up in the project and appear in the Project Navigator:
import Appgain


import Appgain_rich
- Install SDK from cocoa pod
cd your-application-directory

pod init.
-
Navigate to project directory will find podFile
-
Open it and add
pod ‘Appgain’.
- press ctrl S
pod update
Wait until pod finish install.
-
Open your project from your-application.xcworkspace
-
Configure SDK in the app delegate.
-
Allow the application to access the network by adding this in the plist file.
<key>NSAppTransportSecurity</key>

<dict>

<key>NSAllowsArbitraryLoads</key>

<true/>

</dict>
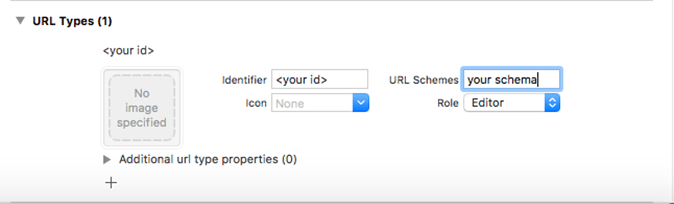
- You need to add your URL schema and Associated domain for your app, the value will be:
projectsubdomain.appgain.io or your custom domain if you have configured it in project settings

Objective-C
- In AppDelegate.h, add
import <Appgain/Appgain.h>
- In AppDelegate.m , Inside didFinishLaunchingWithOptions add below code
- **(BOOL)application**:(UIApplication *)application didFinishLaunchingWithOptions:(NSDictionary *)launchOptions {

//You have two with return closer

[Appgain initialize:<#(NSString *)#> apiKey:<#(NSString *)#> subDomain:<#(NSString *)#> trackUserForAdvertising:<#(BOOL)#> whenFinish:<#^(NSURLResponse *response, NSMutableDictionary *result, NSError *error)onComplete#>]

//or you can use this

return YES;

}
swift
- Create <project-name -Bridging-Header.h
add this on it
#import <Appgain/Appgain.h>
- Inside didFinishLaunchingWithOptions
Appgain.initialize(<#T##projectId: String!##String!#>, apiKey: <#T##String!#>, subDomain: <#T##String!#>, trackUserForAdvertising: <#T##Bool#>, whenFinish: <#T##((URLResponse?, NSMutableDictionary?, Error?) -> Void)!##((URLResponse?, NSMutableDictionary?, Error?) -> Void)!##(URLResponse?, NSMutableDictionary?, Error?) -> Void#>)
Apple IDFA Tracking Setup
- Allow the application to access the IDFA by adding this in the plist file.
<key>NSUserTrackingUsageDescription</key>
    <string>Privacy of our platform users is extremely important and we at Customer App are committed to protecting the same. Your personal information is collected  only to understand your journey within the platform and as a part of the search process.</string>
- add following code
ATTrackingManager.requestTrackingAuthorizationWithCompletionHandler:
This function is advised on the first app launch to ensure the value is captured. The prompt only shows if the app is a fresh install and the user consent status is unknown.
For the majority of applications, only enable tracking if the status is authorized on becoming active (new in iOS 15), as below:
import AppTrackingTransparency

class AppDelegate: UIApplicationDelegate {

    func applicationDidBecomeActive(_ application: UIApplication) {
        if #available(iOS 14, *) {
            ATTrackingManager.requestTrackingAuthorization { status in
                switch status {
                    case .authorized:
                        print("enable tracking")
                    case .denied:
                        print("disable tracking")
                    default:
                        print("disable tracking")
                }
            }
        }
    }
}
- NOTE: UI Logic needs to be wrapped on the DispatchQueue.main queue because the completion block currently executes on a concurrent DispatchQueue.
- After Granted Permission for Tracking we need to call update user data by using function updateUserData(_:)
Deferred Deep Linking
After a new user has installed your app, our SDK will detect if the app was installed from a smart deep link or not, if it's then our SDK will automatically route their flow to marketing campaign desired location in the app (not just to the default home screen).
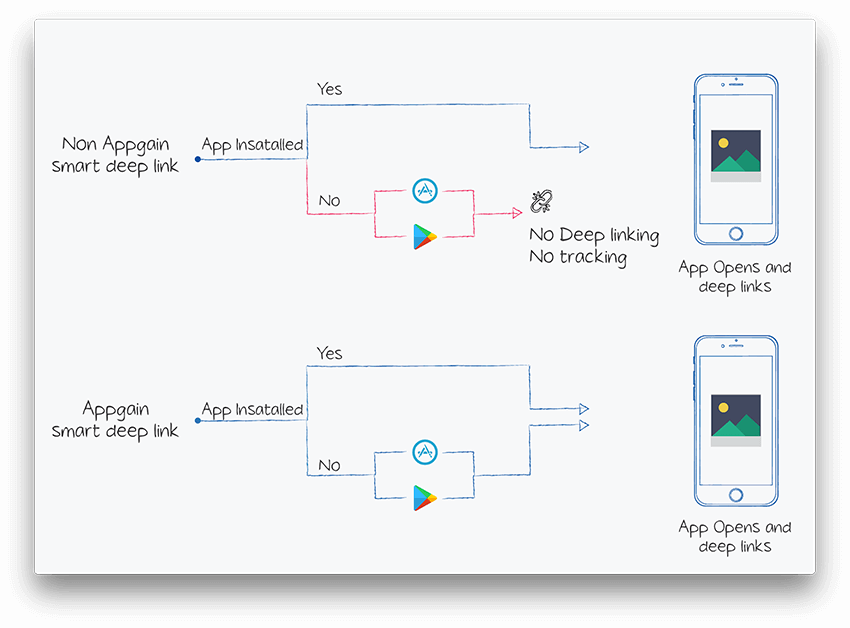
To achieve that, appgain.io SDK must be installed in the app, and the matching process must be initiated
Objective-C
[Appgain matchLink:<#^(NSURLResponse *response, NSMutableDictionary *result, NSError *error)onComplete#>]
swift
Appgain.matchLink(<#T##onComplete: ((URLResponse?, NSMutableDictionary?, Error?) -> Void)!##((URLResponse?, NSMutableDictionary?, Error?) -> Void)!##(URLResponse?, NSMutableDictionary?, Error?) -> Void#>)
You can send your app internal userId, or just send an empty string
Micro Pages Creation
Objective-C
-
create an array of your image slider
-
if you want to create a single page, you can send only one image
NSArray *imagesUrl = [NSArray arrayWithObjects: !<your_image_url>, nil];
- create buttons that you want to appear
MobileLandingPageButton *button1 = [[MobileLandingPageButton alloc]

initWithTitle: <title-for-your-button>

iosTarget: <your-iOS-trigger-point>

andAndroid: <your-android-point-trigger>

andWeb: <your-we-trigger-point>];
- create social media buttons with it is the target
SocialmediaSettings *socialMediaSetting = [[SocialmediaSettings alloc]

initWithTitle:<title>

andDescription:<and-description>

andImage:<and-your-image-url>];
- create a landing page object
MobileLandingPage *tempLandingPage = [[MobileLandingPage alloc]

initWithLogo: <logo-image-url>

andHeader: <landing-page-header>

andParagraph: <landing-page-header>

withSliderUrlImages:imagesUrl

andButtons: [NSArray arrayWithObjects: button1,nil]

andSocialMediaSetting:socialMediaSetting

language:@"en"

andSubscription: <your-subscription>

andimage: <image-url>

andlabel: <lable--text>;
- Request invoke landing page creation
[Appgain createLandingPage:<#(MobileLandingPage *)#> whenFinish:<#^(NSURLResponse *response, NSMutableDictionary *result, NSError *error)onComplete#>]
- Results come back from background thread to the main thread direct, now need to request in the background thread.
swift
- create buttons that you want to appear
let button1 : MobileLandingPageButton = MobileLandingPageButton(

title: <title- text>,

iosTarget: <ios-target-url>,

andAndroid: <mobile-android-target>,

andWeb: <web-target-url>)
- create social media buttons with the target
let socialMediaSetting : SocialmediaSettings = SocialmediaSettings.init(

title: <TITLE-TEXT>,

andDescription: <settting-description-text>,

andImage: <image-url>)
- create a landing page object
let landingObject : MobileLandingPage = MobileLandingPage.init(logo: <logo-url>,

andHeader: <header-text>,

andParagraph: <paragraph-text>,

withSliderUrlImages: <images-urls-array>,

andButtons: <buttons-array>,

andSocialMediaSetting: <social-media-settingobject>,

language: <language-des>,

andSubscription: <subscription-text>,

andimage: <image-url-text>,

andlabel: <label-text>)
- Request creating landing page from SDK:
Appgain.createLandingPage(<#T##landingPage: MobileLandingPage!##MobileLandingPage!#>, whenFinish: <#T##((URLResponse?, NSMutableDictionary?, Error?) -> Void)!##((URLResponse?, NSMutableDictionary?, Error?) -> Void)!##(URLResponse?, NSMutableDictionary?, Error?) -> Void#>)
Marketing Automation
Send Automated and Personalized Push notifications, SMS, or Emails based on your user’s actions and behavior using Apggain’s Powerful Automator, Know More Now!
-
Create an auto message in Appgain Dashboard.
-
Fire the auto message by using this code.
-
you must use the same trigger event that was entered in step 1, as the TriggerPoint in the following code.
Objective-C
[Appgain fireAutomator:<#(NSString *)#> personalizationData:<#(NSMutableDictionary *)#> whenFinish:<#^(NSURLResponse *response, NSMutableDictionary *result, NSError *error)onComplete#>]
swift
Appgain.fireAutomator(<#T##triggerPoint: String!##String!#>, personalizationData: <#T##NSMutableDictionary!#>, whenFinish: <#T##((URLResponse?, NSMutableDictionary?, Error?) -> Void)!##((URLResponse?, NSMutableDictionary?, Error?) -> Void)!##(URLResponse?, NSMutableDictionary?, Error?) -> Void#>)
Revenue Tracking
you can add new Purchase Transactions object by using the following snippet :
Objective-C:
[Appgain logPurchase:<#(NSString *)#> withAmount:<#(double)#> forCurrency:<#(NSString *)#> whenFinish:<#^(NSURLResponse *response, NSMutableDictionary *result, NSError *error)onComplete#>]
swift
Appgain.logPurchase(<#T##productName: String!##String!#>, withAmount: <#T##Double#>, forCurrency: <#T##String!#>, whenFinish: <#T##((URLResponse?, NSMutableDictionary?, Error?) -> Void)!##((URLResponse?, NSMutableDictionary?, Error?) -> Void)!##(URLResponse?, NSMutableDictionary?, Error?) -> Void#>)
Custom Events Tracking
at your app whenever you want to log AppEvent, add the following snippet :
Objective-C
[Appgain logEvent:<#(NSString *)#> andAction:<#(NSString *)#> extras:<#(NSDictionary *)#> whenFinish:<#^(NSURLResponse *response, NSMutableDictionary *result, NSError *error)onComplete#>]
swift
Appgain.logEvent(<#T##event: String!##String!#>, andAction: <#T##String!#>, extras: <#T##[AnyHashable : Any]!#>, whenFinish: <#T##((URLResponse?, NSMutableDictionary?, Error?) -> Void)!##((URLResponse?, NSMutableDictionary?, Error?) -> Void)!##(URLResponse?, NSMutableDictionary?, Error?) -> Void#>)
Smart Deep Link Creation
Add your smart deep link values:
-
Name: give an identifier for your smart deep link; you might want to use it when creating a deep page.
-
Description: describe your smart link for social representation.
-
Android target: when your smart link is opened from an android device, you have to choose a primary link for the users to be directed to, and in case this primary link is not working, the secondary link should open.
-
IOS target: when your smart link is opened from iOS device, you have to choose a primary link for the users to be directed to, and in case this primary link is not working, the secondary link should open.
Note that both the primary and fallback links are mandatory. Also they can be just simple URLS or deep links.
- Web URL: when your smart link is opened from a PC, you have to choose where does the smart link shall direct the user.
Objective-C
- create target objects for different platform (ios,android,web)
TargetPlatform *web = [[TargetPlatform new] initWithPrimary: <https://google.com withFallBack:@""];


TargetPlatform *android = [[TargetPlatform new] initWithPrimary:<https://google.com> withFallBack:<https://youtube.com>];


TargetPlatform *ios = [[TargetPlatform new] initWithPrimary:<https://google.com withFallBack: <https://youtube.com];


// best things to know you donot need to worry about thread add this thing run in background thread

//and response and result come back to you in main thread to update for user data.
- create smart link object
SmartDeepLink *smartObject = [[SmartDeepLink new] initWithHeader:<header_text>

andImage:<Your-image-url>

andDescription:<your-description>

andName:<name-text>

iosTarget:<ios-target-object>

androidTarget:<android-target-object>

webTarget:<web-target-object>];


[smartObject setSlug:@“your slug”]; ///optional

[Appgain createSmartLink:<#(SmartDeepLink *)#> whenFinish:<#^(NSURLResponse *response, NSMutableDictionary *result, NSError *error)onComplete#>]
swift
let webTarget : TargetPlatform = TargetPlatform.init(primary: <your_primary> ,

withFallBack: <fallback_of_it>)


let smartObject : SmartLinkObject = SmartDeepLink.init(header: <header_string>,

andImage: <image_url>,

andDescription: <description_url>,

andName:<name>,

iosTarget: <TargetPlatform_ios>,

androidTarget: <TargetPlatform_android>,

webTarget: <TargetPlatform_web>)


Appgain.createSmartLink(<#T##linkObject: SmartDeepLink!##SmartDeepLink!#>, whenFinish: <#T##((URLResponse?, NSMutableDictionary?, Error?) -> Void)!##((URLResponse?, NSMutableDictionary?, Error?) -> Void)!##(URLResponse?, NSMutableDictionary?, Error?) -> Void#>)
Push Notification Setup
Push Token Registration
-
Enable push notification: Capabilities -> Push Notifications -> ON
-
add following functions in the App Delegate
- **(BOOL)application**:(UIApplication *)application didFinishLaunchingWithOptions:(NSDictionary *)launchOptions {

//MARK: setting for push notification

if(SYSTEM_VERSION_GRATERTHAN_OR_EQUALTO(@"10.0")){

UNUserNotificationCenter *center = [UNUserNotificationCenter currentNotificationCenter];

[center requestAuthorizationWithOptions:(UNAuthorizationOptionSound | UNAuthorizationOptionAlert | UNAuthorizationOptionBadge) completionHandler:^(BOOL granted, NSError * _Nullable error){

if(!error){


dispatch_async(dispatch_get_main_queue(), ^{

[[UIApplication sharedApplication] registerForRemoteNotifications];

});

}

}];

}

else {


UIUserNotificationType userNotificationTypes = (UIUserNotificationTypeAlert | UIUserNotificationTypeBadge | UIUserNotificationTypeSound);

UIUserNotificationSettings *settings = [UIUserNotificationSettings settingsForTypes:userNotificationTypes categories:nil];

[application registerUserNotificationSettings:settings];

[application registerForRemoteNotifications];


}

}


- **(void)registerApplicationForPushNotifications**:(UIApplication *)application

{

// Set up push notifications

// For more information about Push, check out:

if ([application respondsToSelector:@selector(registerForRemoteNotifications)]) {

// Register device for iOS8

UIUserNotificationSettings *notificationSettings = [UIUserNotificationSettings settingsForTypes:UIUserNotificationTypeAlert | UIUserNotificationTypeBadge | UIUserNotificationTypeSound categories:nil];

[application registerUserNotificationSettings:notificationSettings];

[application registerForRemoteNotifications];

} else {

// Register device for iOS7

[application registerForRemoteNotificationTypes:UIRemoteNotificationTypeAlert | UIRemoteNotificationTypeSound | UIRemoteNotificationTypeBadge];

}


}


- **(void)application**:(UIApplication *)application didRegisterForRemoteNotificationsWithDeviceToken:(NSData *)deviceToken{


[Appgain RegisterDeviceWithToken:<#(NSData *)#>]


//swift

Appgain.registerDevice(withToken: <#T##Data!#>)

}
- for receive remote notification you need to add both of two method so you can track your notifications open.
- **(void)application**:(UIApplication *)application didReceiveRemoteNotification:(NSDictionary *)userInfo fetchCompletionHandler:(nonnull void (^)(UIBackgroundFetchResult))completionHandler{

///that call notification track automatic inside it whit status that is opened.

//objective-c

[Appgain handlePush:<#(NSDictionary *)#> forApplication:<#(UIApplication *)#>]

//swift

Appgain.handlePush(<#T##userInfo: [AnyHashable : Any]!##[AnyHashable : Any]!#>, for: <#T##UIApplication!#>)

/// to handle url form notification content

//objective-c

[NSString* url = [userInfo objectForKey:@"url"];
 [[UIApplication sharedApplication] openURL:url]];}
}

//swift
    if let url = userInfo["url"] as? String{
        if  let urll = URL(string: url){
          UIApplication.shared.open(urll) { (result) in

            }
        }
    }

}


- **(void)application**:(UIApplication *)application didReceiveRemoteNotification:(NSDictionary *)userInfo{


///that call notification track automatic inside it whit status that is opened.

[Appgain handlePush:<#(NSDictionary *)#> forApplication:<#(UIApplication *)#>]
swift
import UserNotifications

func registerForPushNotifications() {
if #available(iOS 10.0, *) {
// For iOS 10 display notification (sent via APNS)
UNUserNotificationCenter.current().delegate = self
let authOptions: UNAuthorizationOptions = [.alert, .badge, .sound]
UNUserNotificationCenter.current().requestAuthorization(
options: authOptions,
completionHandler: {_, _ in })
} else {
let settings: UIUserNotificationSettings =
UIUserNotificationSettings(types: [.alert, .badge, .sound], categories: nil)
DispatchQueue.main.async {
UIApplication.shared.registerUserNotificationSettings(settings)
}
}
DispatchQueue.main.async {
UIApplication.shared.registerForRemoteNotifications()
}
}

}

func application(_ application: UIApplication,didRegisterForRemoteNotificationsWithDeviceToken deviceToken: Data) {

let tokenParts = deviceToken.map { data in String(format: "%02.2hhx", data) }

let token = tokenParts.joined()

print("Device Token: \(token)")

Appgain.registerDevice(withToken: deviceToken)

}

func application(_ application: UIApplication,didFailToRegisterForRemoteNotificationsWithError error: Error) {

print("Failed to register: \(error)")

}

func application(_ application: UIApplication, didReceiveRemoteNotification userInfo: [AnyHashable : Any]) {

Appgain.handlePush(userInfo, for: application)

}

@available(iOS 10.0, *)
func application(_ application: UIApplication, didReceiveRemoteNotification userInfo: [AnyHashable : Any], fetchCompletionHandler completionHandler: @escaping (UIBackgroundFetchResult) -> Void) {

completionHandler(.newData)

Appgain.handlePush(userInfo, for: application)

}
- Silent Push Notification Handling
Objective-C
if (!userInfo[@"alert"]){ //check that alert nill which mean that push is silent

if ([userInfo[@"op"] isEqualToString:@"<! value of key you set it in dashborad >"]){


}

}
swift
if (!userInfo[@"alert"]){ //check that alert nill which mean that push is silent

if (userInfo[@"op"] == "<! value of key you set it in dashborad >"){


}

}
- To allow notification banner appear while app open
Objective-C
- **(void)userNotificationCenter**:(UNUserNotificationCenter *)center willPresentNotification:(UNNotification *)notification withCompletionHandler:(void (^)(UNNotificationPresentationOptions options))completionHandler{
    NSLog(@"User Info : %@",notification.request.content.userInfo);
    completionHandler(UNAuthorizationOptionSound | UNAuthorizationOptionAlert | UNAuthorizationOptionBadge);
    [Appgain handlePush:notification.request.content.userInfo forApplication:NULL];
}
swift
@available(iOS 10.0, *)
func userNotificationCenter(_ center: UNUserNotificationCenter, willPresent notification: UNNotification, withCompletionHandler completionHandler: @escaping (UNNotificationPresentationOptions) -> Void) {

completionHandler([.alert,.sound,.badge])

let userInfo = notification.request.content.userInfo

Appgain.handlePush(userInfo, for: nil)

}
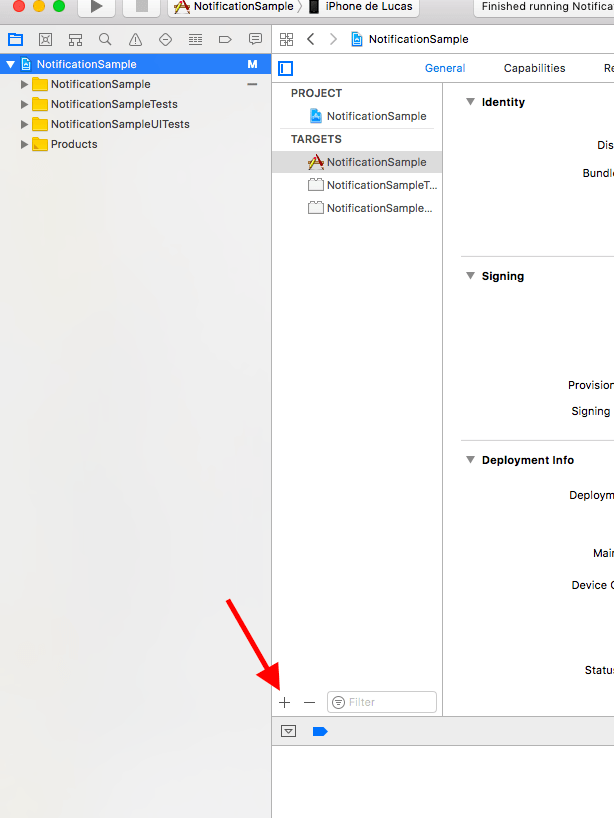
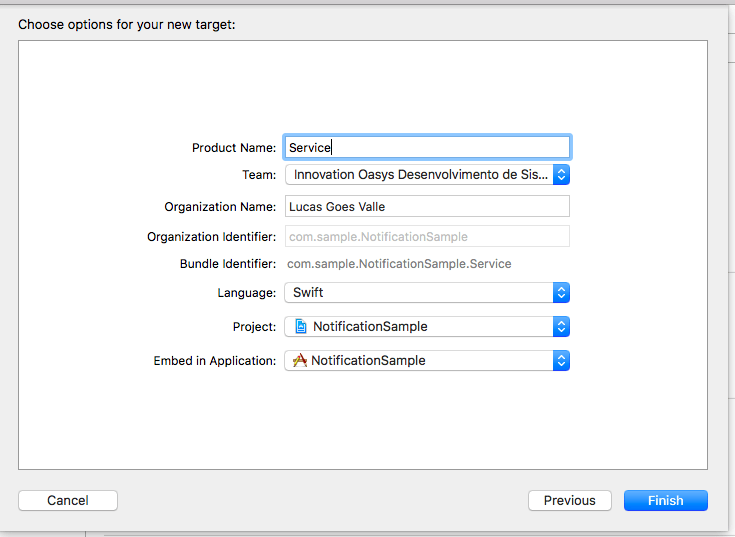
Rich Notification
this integration is optional , if not done then Video,HTML,GIF Push will not work
-
Add Notification Service Extension: go to your xcodeproj in xcode --->
-
Add Target* -->
-
Notification Service Extension >Next > Finish > Activate Scheme Content*
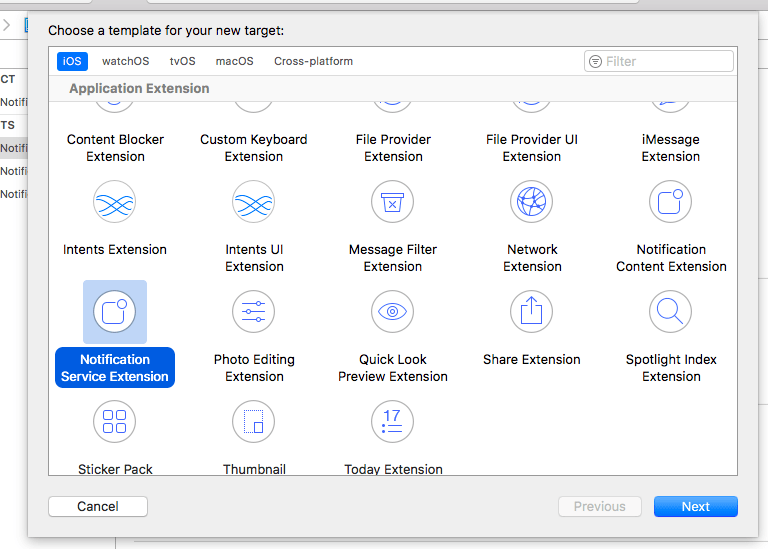
-
Add Notification Content Extension: Add Target -->
-
Notification Content Extension >Next > Finish > Activate Scheme Content*
-
Configure category for your notification extension:
Go to your Content target folder --> info.plist , and add below content
<?xml version="1.0" encoding="UTF-8"?>
<!DOCTYPE plist PUBLIC "-//Apple//DTD PLIST 1.0//EN" "http://www.apple.com/DTDs/PropertyList-1.0.dtd">
<plist version="1.0">
<dict>
    <key>NSExtension</key>
    <dict>
        <key>NSExtensionAttributes</key>
        <dict>
            <key>UNNotificationExtensionCategory</key>
            <array>
                <string>rich-apns</string>
            </array>
            <key>UNNotificationExtensionInitialContentSizeRatio</key>
            <real>1</real>
            <key>UNNotificationExtensionUserInteractionEnabled</key>
            <true/>
        </dict>
        <key>NSExtensionMainStoryboard</key>
        <string>MainInterface</string>
        <key>NSExtensionPointIdentifier</key>
        <string>com.apple.usernotifications.content-extension</string>
    </dict>
</dict>
</plist>
-
also need to modify MainInterface.storyboard change NotificationViewController window size to be height 300 and remove all outlet form it
-
Go to your Service target folder --> info.plist , and add below content
<?xml version="1.0" encoding="UTF-8"?>
<!DOCTYPE plist PUBLIC "-//Apple//DTD PLIST 1.0//EN" "http://www.apple.com/DTDs/PropertyList-1.0.dtd">
<plist version="1.0">
<dict>
    <key>NSExtension</key>
    <dict>
        <key>NSExtensionPointIdentifier</key>
        <string>com.apple.usernotifications.service</string>
        <key>NSExtensionPrincipalClass</key>
        <string>$(PRODUCT_MODULE_NAME).NotificationService</string>
        <key>UNNotificationExtensionCategory</key>
        <string>rich-apns</string>
    </dict>
</dict>
</plist>
-
Add UNNotificationExtensionDefaultContentHidden and set it to true to show only our custom view controller in the notification interface.
-
install by swift package manger
1- need to add product Appgain-rich form SPM you installed already before in start form this url https://github.com/appgain/appgain-SDK-iOs.git
2- add to one of target
3- another target you can link it from General --> Frameworks and Libraries
import Appgain_rich
- Install pods
open you workspace pod file add the following to it
target ‘#your content target #’

pod 'Appgain-Rich'

end
target ‘#your service target #’

pod 'Appgain-Rich'

end
- Setting your extension files
Objective-C
add import #import <Appgain-Rich/AppgainRich.h>


inside (NotificationViewController.h , NotificationService.h)
swift
import Appgain_Rich
- Go file NotificationViewController.m and add below code:
- **(void*)didReceiveNotification**:(UNNotification *)notification {

self.label.text = notification.request.content.body;

// add this line

//Objective-C

[AppgainRich didReceiveNotification:notification inViewController:self];

}
swift
func didReceive(_ notification: UNNotification) {

self.label?.text = notification.request.content.body

AppgainRich.didReceive(notification, in: self)

}
- Go file NotificationService.m and add below code:
- **(void*)didReceiveNotificationRequest**:(UNNotificationRequest *)request withContentHandler:(**void** (^)(UNNotificationContent * **_Nonnull**))contentHandler {

self.contentHandler = contentHandler;

self.bestAttemptContent = [request.content mutableCopy];

// Modify the notification content here..


self.bestAttemptContent.title = [NSString stringWithFormat:@"%@", self.bestAttemptContent.title];


//add rich notification SDK handle

[AppgainRich didReceiveNotificationRequest:request andNotificationContent:_bestAttemptContent withContentHandler:contentHandler];

self.contentHandler(self.bestAttemptContent);

}
swift
override func didReceive(_ request: UNNotificationRequest, withContentHandler contentHandler: @escaping (UNNotificationContent) -> Void) {

self.contentHandler = contentHandler

bestAttemptContent = (request.content.mutableCopy() as? UNMutableNotificationContent)


if let bestAttemptContent = bestAttemptContent {

// Modify the notification content here...

bestAttemptContent.title = "\(bestAttemptContent.title) [modified]"

AppgainRich.didReceive(request, andNotificationContent: bestAttemptContent, withContentHandler: contentHandler)

contentHandler(bestAttemptContent)

}

}
Push Conversion Tracking
Stay informed of user flow and make further improvements based on detailed real-time conversion metrics, the following events are tracked :
-
received: android only users who got the push
-
dismissed: android only users who rejected the push and didn’t open it
-
open: users opened the push
-
conversion: users performed the conversion action, it's recorded either automatically when your App record purchase transaction (Revenue Tracking ) or by using the below code.
-
There two statuses of notification
[NotificationStatus.Conversion]

[NotificationStatus.Opened]
Objective-C
[Appgain recordPushStatus:[NotificationStatus.Opened] userInfo:<#(NSDictionary *)#> whenFinish:<#^(NSURLResponse *response, NSMutableDictionary *result, NSError *error)onComplete#>]
swift
AppGain.trackNotification(withAction: NotificationStatus.opened(),

andUserInfo: user-info) { (response, result,error) in

}

Appgain.recordPushStatus( NotificationStatus.opened(), userInfo: <#T##[AnyHashable : Any]!#>, whenFinish: <#T##((URLResponse?, NSMutableDictionary?, Error?) -> Void)!##((URLResponse?, NSMutableDictionary?, Error?) -> Void)!##(URLResponse?, NSMutableDictionary?, Error?) -> Void#>)
Create and Control notifications channels
_you will find object for notification channels type _
type use for channel to sent notification for mobile device throw app
[NotificationType SMS]


[NotificationType appPush]


[NotificationType email]
Create Notification Channels
Objective-C
[Appgain createNotificationChannel:<#(NSString *)#> withData:<#(NSString *)#> whenFinish:<#^(NSURLResponse *response, NSMutableDictionary *result, NSError *error)onComplete#>]
swift
Appgain.createNotificationChannel(<#T##type: String!##String!#>, withData: <#T##String!#>, whenFinish: <#T##((URLResponse?, NSMutableDictionary?, Error?) -> Void)!##((URLResponse?, NSMutableDictionary?, Error?) -> Void)!##(URLResponse?, NSMutableDictionary?, Error?) -> Void#>)
Controll Notification Channels
Objective-C
[Appgain enableNotifications:<#(BOOL)#> forType:<#(NSString *)#> whenFinish:<#^(NSURLResponse *response, NSMutableDictionary *result, NSError *)onComplete#>]
swift
Appgain.enableNotifications(<#T##isEnabled: Bool##Bool#>, forType: <#T##String!#>, whenFinish: <#T##((URLResponse?, NSMutableDictionary?, Error?) -> Void)!##((URLResponse?, NSMutableDictionary?, Error?) -> Void)!##(URLResponse?, NSMutableDictionary?, Error?) -> Void#>)
Update User ID
This useful to update all record for user with new user id and link it with your business server to keep every things connect together.
Steps to Follow:
update user id
Objective-C
[Appgain updateUserId:<your_new_user_id>];
swift
Appgain.updateUserId(<#T##userId: String!##String!#>)
Set Custom User Attributes
This useful to update user data of add new records and keys for user
Steps to Follow:
update user data it takes user data ad dictionary key and value.
Objective-C
[Appgain updateUserData:<#(NSDictionary *)#> whenFinish:<#^(NSURLResponse *response, NSMutableDictionary *result, NSError *error)onComplete#>]
swift
Appgain.updateUserData(<#T##userData: [AnyHashable : Any]!##[AnyHashable : Any]!#>, whenFinish: <#T##((URLResponse?, NSMutableDictionary?, Error?) -> Void)!##((URLResponse?, NSMutableDictionary?, Error?) -> Void)!##(URLResponse?, NSMutableDictionary?, Error?) -> Void#>)
Frequently Asked Questions (FAQ)
What is the Appgain.io iOS SDK?
The Appgain.io iOS SDK is a native iOS library that enables integration with Appgain.io's marketing platform, providing features like push notifications, deep linking, user tracking, and marketing automation for iOS apps.
What are the prerequisites for iOS SDK integration?
You need: - Xcode - Appgain.io account and Project ID - iOS Push Certificate (P12 file) - Associated domains configuration
How do I install the iOS SDK?
You can install via:
1. Swift Package Manager: Add the GitHub repository
2. CocoaPods: Add pod 'Appgain' to your Podfile
3. Manual: Download and add the framework
What iOS versions are supported?
The SDK supports iOS 10.0 and later versions.
How do I set up push notifications for iOS?
- Generate an iOS Push Certificate (P12 file)
- Configure your app's capabilities for push notifications
- Add the certificate to your Appgain.io dashboard
- Handle device token registration in your app
What is the Associated Domains feature?
Associated Domains allow your app to handle universal links from Appgain.io domains. You need to add your project subdomain (e.g., yourproject.appgain.io) to your app's Associated Domains capability.
How do I initialize the iOS SDK?
Use Appgain.init() with your Project ID and API Key in your AppDelegate's didFinishLaunchingWithOptions method.
What features does the iOS SDK provide?
- Push notifications with rich media support
- Deep linking and universal links
- User tracking and analytics
- Marketing automation triggers
- Revenue tracking
- Custom event logging
- Rich notification extensions
How do I handle rich push notifications?
The SDK includes Appgain-Rich framework for handling rich media notifications. You need to add Notification Service and Content Extensions to your app.
Can I use the SDK with both Swift and Objective-C?
Yes, the SDK supports both Swift and Objective-C. All methods are available in both languages.
How do I track user events?
Use Appgain.logEvent() to track custom events and user interactions in your app.
What is the difference between Appgain and Appgain-Rich?
Appgain is the main SDK, while Appgain-Rich provides additional functionality for rich push notifications with media content.
How do I update user attributes?
Use Appgain.updateUserData() to update user information and custom attributes for personalization.