Disclaimer :Appgain iOnic SDK is End of Life, we are not supporting it any more
Installation
To install the Appgain ionic plugin in your app, run the following commands
npm i https://github.com/Appgain/IonicAppgainNGX.git --save
ionic cordova plugin add https://github.com/Appgain/Cordova-SDK.git
Initializing
To initialize appgain SDK, call the following method on app start
async () => {
    try {
        await AppgainSDK.initSDK(
            "projectId",
            "apiKey",
            true
        );
    } catch (error) {
        console.log("Error: ", error);
    }
}
Deferred Deep Linking
After a new user has installed your app, our SDK will detect if the app was installed from a smart deep link or not, if it's then our SDK will automatically route their flow to marketing campaign desired location in the app (not just to the default home screen).
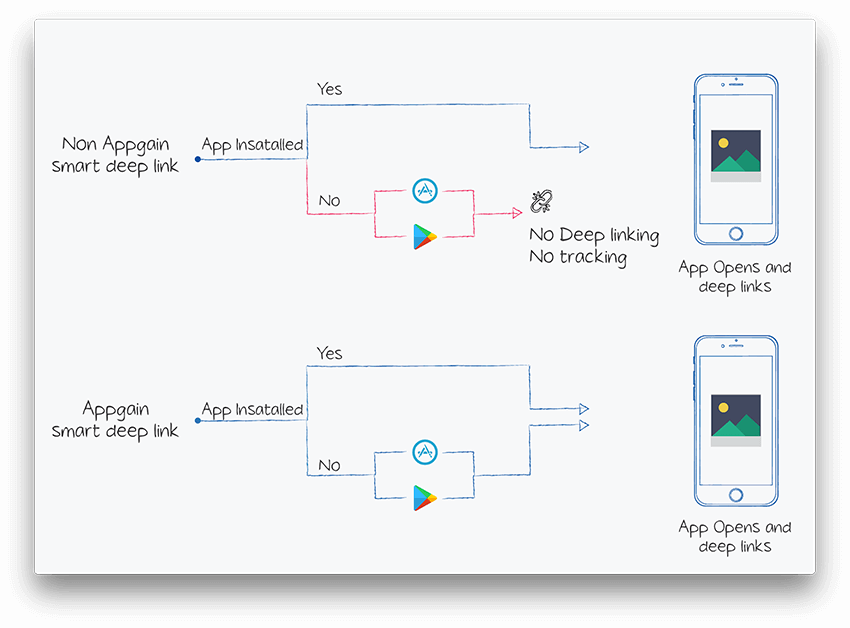
To achieve that, appgain.io SDK must be installed in the app, and the matching process must be initiated
async () => {
    try {
        let result = await AppgainSDK.matchLink();
        console.log("result:", result);
    } catch (error) {
        console.log("Error: ", error);
    }
}
This function returns an empty json object if matching fails, and the following data if the matching succeeded:
| Returned Field | Description |
|---|---|
| smart_link_url | the URL of smart deep link used to open or install the App |
| smart_link_id | the Id of smart deep link used to open or install the App |
| smart_link_name | the Id of smart deep link used to open or install the App |
| match_type | how the device identification is done , it could be basic(Digital fingerprinting) or advertising_id |
| extra_data | array of more data |
| extra_data.userId | user Id that was appended to smart link url on opening it phase |
| params | array of all paramaters appended to smart link url , like SDL URL?utm_source=fb |
| smart_link_primary | primary redirection action |
Marketing Automation
Send Automated and Personalized Push notifications, SMS or Emails based on your user’s actions and behavior using Apggain’s Powerful Automator, Know More Now!
- Create an auto message in Appgain Dashboard .
- Fire the auto message by using this code.
- you must use the same trigger event that was entered in step 1, as the TriggerPoint in the following code.
with Personalization
async () => {
    try {
        let personalization = {};
        personalization[key] = value;
        await AppgainSDK.fireAutomator("triggerPoint", personalization);
    } catch (error) {
        console.log("Error: ", error);
    }
}
without Personalization
async () => {
    try {
        await AppgainSDK.fireAutomator("triggerPoint", {});
    } catch (error) {
        console.log("Error: ", error);
    }
}
Revenue Tracking
async () => {
    try {
        await this.sdk.addPurchase(productName, amount, currency);
    } catch (error) {
        console.log("err:", error);
    }
}
Custom Events Tracking
whenever you want to log user event , add below code
async () => {
    var type = "type";
    var action = "action";
    var extras = {key: "value"};
    try {
        await AppgainSDK.logEvent(type, action, extras);
    } catch (error) {
        console.log("Error: ", error);
    }
}
Notification Channels
To add user SMS notification channel
   try {
        await this.sdk.addNotificationChannel("SMS", userPhone);
    } catch (error) {
        console.log("err:", error);
    }
To add user email notification channel
    try {
        await this.sdk.addNotificationChannel("email", userPhone);
    } catch (error) {
        console.log("err:", error);
    }
Getting Appgain user Id
   try {
      let result = await this.sdk.getUserId();
      console.log("userId: ", result);
    } catch (error) {
      console.log("err:", error);
    }
Setting Appgain user Id
   try {
        await this.sdk.setUserId(newUserId);
    } catch (error) {
        console.log("err:", error);
    }
Set Custom User Attributes
    try {
        let userData = {
            // user data
        };
        await AppgainSDK.updateUserData(userData);
    } catch (error) {
        console.log("Error: ", error);
    }
Android Specific Instructions
- Inside the platform/android/app/build.gradle file, make sure that multiDex is enabled:
    android{
        multiDexEnabled = true
    }
- and in the end of your file add the following line
apply plugin: 'com.google.gms.google-services'
- open your platform/android/build.gradle file and add following line under dependencies
 dependencies {
    classpath 'com.google.gms:google-services:4.3.3'
 }
- and in all projects
    repositories {
        maven { url 'http://sdk.appgain.io/repository/maven-releases/' }
        google()
        jcenter()
    }
- also make sure you have the google-services.json file located in your application's app folder
Push Notification setup
- **Open Firebase console, Go to project settings
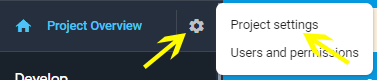
- Go to Cloud Messaging tab and copy SenderID and Legacy server key
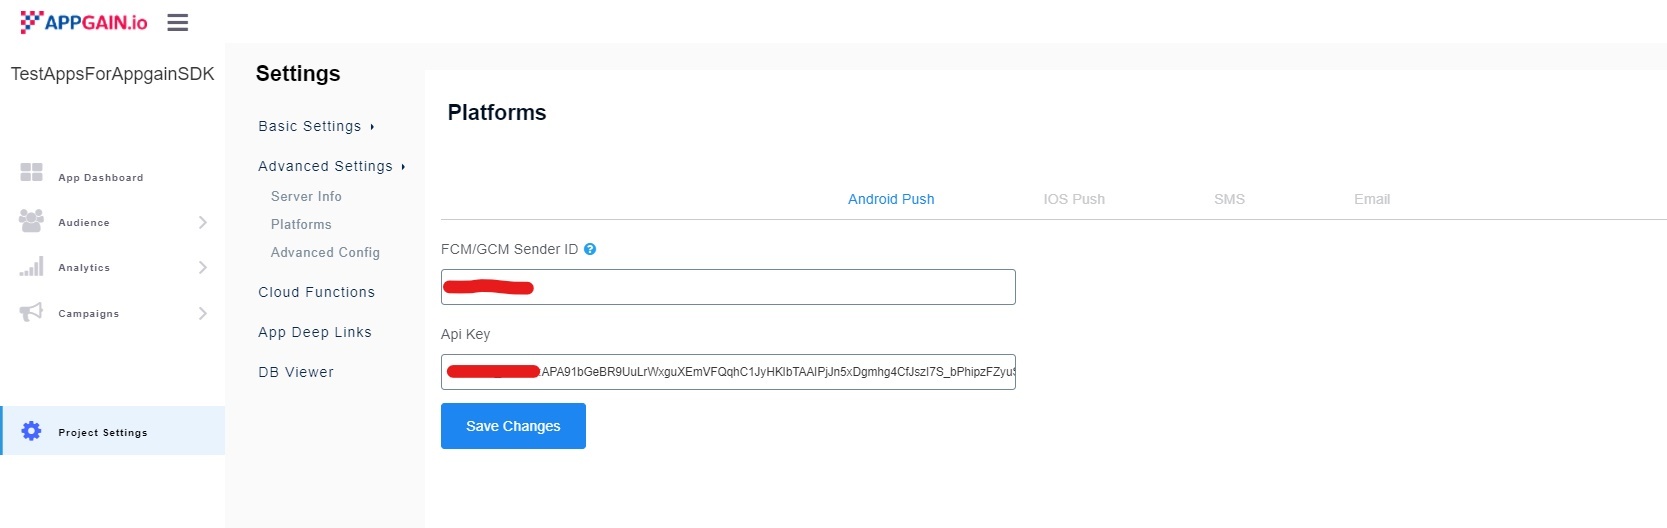
-
Open appgain dashboard**
-
Go to APP BACKEND > Settings
-
Navigate to Android push tab
- enter your SenderID and Server key
iOS Specific Instructions
Add Notification to your iOS target:-
Add Appgain Rich Notification
1- Add target for rich notification
2- Add pod of rich push for two target
  target '<service and content targets name' do
  use_frameworks!

  pod 'Appgain-Rich'

end
Finally You Can Use Appgain SDKTestApp to Test Appgain Features Before Integrate Your App with Appgain