Getting Started
Appgain.io React Native SDK Setup Guide. Works with iOS, Android, and derivatives like Amazon.
Required For Setup
- Appgain.io Account if you do not already have one
- Your Appgain.io Project ID, available in Project Settings
- Generate iOS and Android Push Credentials
Generate Credentials
Before setting up the React Native SDK, you must generate the appropriate credentials for the platform(s) you are releasing on:
Installation
- Add Appgain.io
at the root dir of you react native project , run this
$ npm install react-native-appgain-sdk-library --save
- Link Appgain.io
$ react-native link react-native-appgain-sdk-library
- **you can download test project from this repo
iOS install instructions
If you're already using Cocoapods, add the following to your Podfile
pod 'react-native-appgain-sdk', path: '../node_modules/react-native-appgain-sdk-library'
Otherwise, setup Podfile according to react native documentation, so the Podfile will look like this:
source 'https://github.com/CocoaPods/Specs.git'
platform :ios, '10.0'

target 'YourTargetName' do
    pod 'React', :path => '../node_modules/react-native', :subspecs => [
        'Core',
        'CxxBridge', # Include this for RN >= 0.47
        'DevSupport', # Include this to enable In-App Devmenu if RN >= 0.43
        'RCTText',
        'RCTNetwork',
        'RCTWebSocket', # Needed for debugging
        'RCTAnimation', # Needed for FlatList and animations running on native UI thread
        ]
    # Explicitly include Yoga if you are using RN >= 0.42.0
    pod 'yoga', :path => '../node_modules/react-native/ReactCommon/yoga'
    pod 'DoubleConversion', :podspec => '../node_modules/react-native/third-party-podspecs/DoubleConversion.podspec'
    pod 'glog', :podspec => '../node_modules/react-native/third-party-podspecs/glog.podspec'
    pod 'Folly', :podspec => '../node_modules/react-native/third-party-podspecs/Folly.podspec'
#our pod
    pod 'react-native-appgain-sdk', path: '../node_modules/react-native-appgain-sdk-library'

end
Remember to replace YourTargetName with your actual target name.
- Next, run
$ cd ios
$ pod install
Android Specific Instructions
-
**go to https://firebase.google.com and log in with a Google Account.
-
At Firebase Website, in the right corner click on GO TO CONSOLE and click on Add Project , then give your Project a name.
-
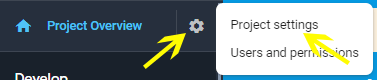
Click on the settings icon next to Project Overview and then click on Project Settings
-
Click on GENERAL > Add Firebase to your Android app icon then fill in fields with:
- Android package name: you can find it's value inside application Id value in app/build.gradle
- Debug signing certificate SHA-1, you can get it from:
- Android studio > Gradle menu in (right toolbar of android studio)
- Click on app menu
- Click on android menu
- Click on android on signingReport tas
- Get SHA1 from run menu
- Return to Firebase console click on REGISTER APP.
- Download google-services.json file
-
Add google-services.json file to app folder in your android project files
-
Open the build.gradle file in the root directory of your Android Studio project.
- Go to allprojects > repositories and configure the Maven repository address for the Appgain Core SDK.
    allprojects {
        repositories {
            maven { url "http://sdk.appgain.io/repository/maven-releases/" }
            google()
            jcenter()
        }
    }
- Open the build.gradle directory in the app's root directory of your project.
- Add following lines under dependencies.
   dependencies {
   dependencies {
      implementation 'io.appgain.sdk:appgain-android:4.4.0'
      implementation 'com.google.firebase:firebase-analytics'
      implementation 'com.google.firebase:firebase-messaging'
      implementation 'com.google.android.gms:play-services-ads-lite:18.1.0'
      implementation 'com.google.android.gms:play-services-location:17.0.0'
      implementation 'io.reactivex.rxjava2:rxandroid:2.1.1'
      implementation 'io.reactivex.rxjava2:rxjava:2.2.19'
      implementation 'com.squareup.retrofit2:converter-scalars:2.1.0'
      implementation 'com.squareup.retrofit2:adapter-rxjava2:2.9.0'
      implementation 'com.android.support.constraint:constraint-layout:1.1.3'
      implementation 'com.squareup.retrofit2:retrofit:2.3.0'
      implementation 'com.squareup.retrofit2:converter-gson:2.3.0'
      implementation 'com.squareup.okhttp3:logging-interceptor:4.7.2'
      implementation 'com.google.android.exoplayer:exoplayer:2.15.1'
      implementation 'com.github.bumptech.glide:glide:4.10.0'
      annotationProcessor  'com.github.bumptech.glide:compiler:4.10.0'
        }
- also make sure that multiDex is enabled:
    android{
        multiDexEnabled = true
    }
- and in the end of your file add the following line
apply plugin: 'com.google.gms.google-services'
- open your project/build.gradle file and add following line under dependencies
 dependencies {
    classpath 'com.google.gms:google-services:4.3.3'
 }
Push Notification setup
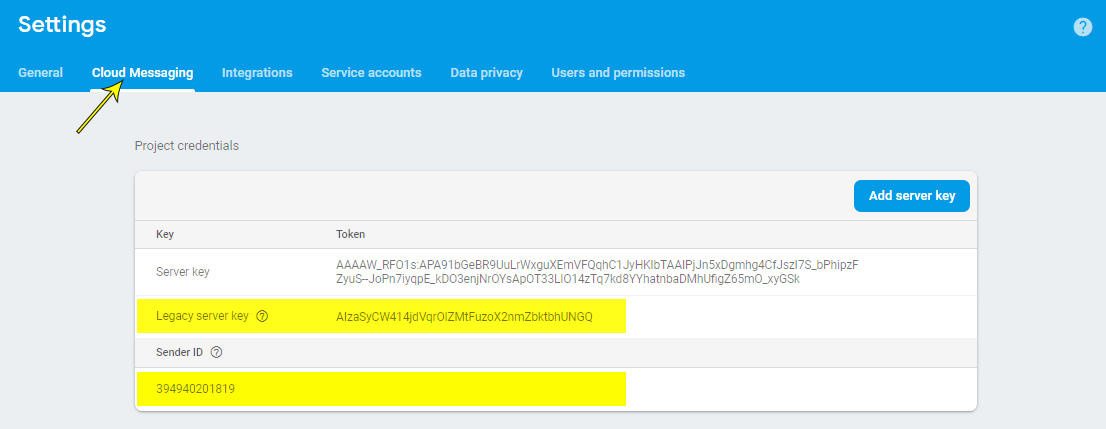
- **Open Firebase console, Go to project settings
- Go to Cloud Messaging tab and copy SenderID and Legacy server key
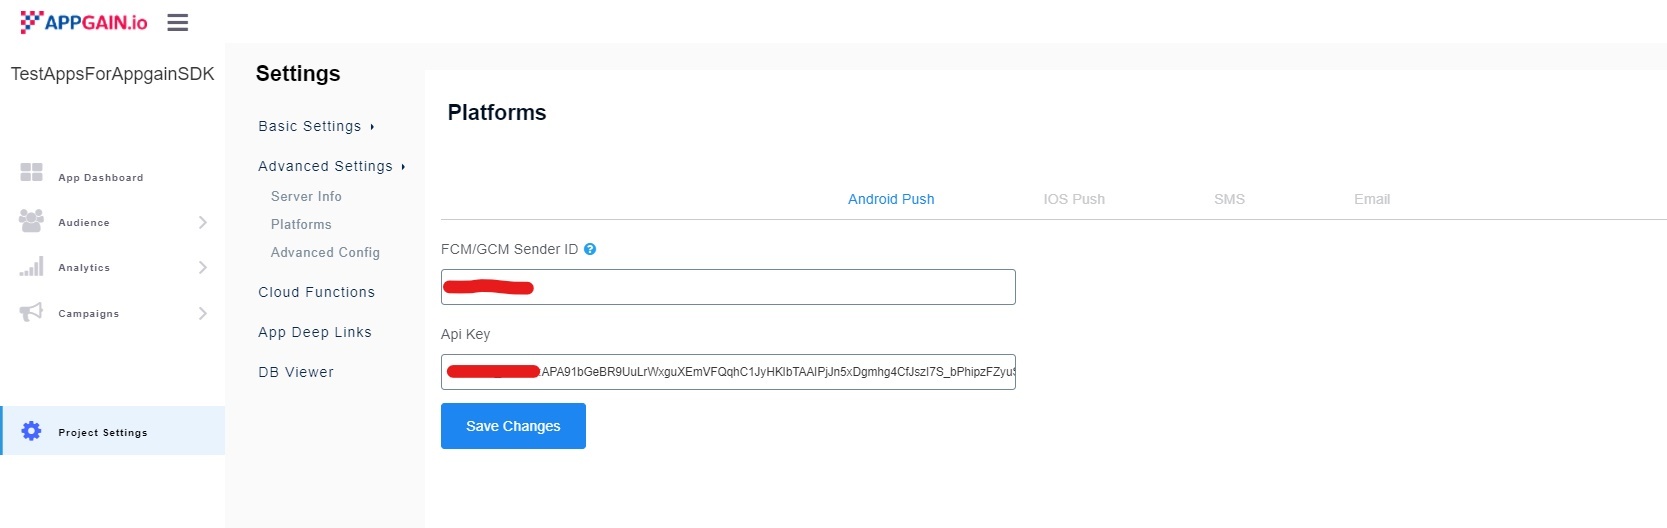
- Open appgain dashboard**
- Go to APP BACKEND > Settings
- Navigate to Android push tab
-
enter your SenderID and Server key
-
create a new class that extends from AppgainPushReceiver class
package com.react_native_sdk_test_app;

import android.content.Context;
import android.content.Intent;

import androidx.annotation.NonNull;

import io.appgain.sdk.controller.AppgainPushReceiver;
import io.appgain.sdk.model.push.ReceiveStatus;


public class PushReceiver extends AppgainPushReceiver {

    @Override
    public void onReceive(Context context, Intent intent) {
        super.onReceive(context, intent);
    }

    @Override
    protected void onReceive(Context context, ReceiveStatus receiveStatus, Intent intent) {

    }

    @Override
    protected void onSilentPushReceive(@NonNull String operation) {
        super.onSilentPushReceive(operation);
    }
}
- open manifest.xml file and add the following lines:
    <receiver
            android:name=".PushReceiver"
            android:exported="false">
            <intent-filter>
                <action android:name="com.parse.push.intent.RECEIVE" />
                <action android:name="com.parse.push.intent.DELETE" />
                <action android:name="com.parse.push.intent.OPEN" />
            </intent-filter>
        </receiver>


        <service
            android:name="io.appgain.sdk.controller.AppgainMessagingService">
            <intent-filter>
                <action android:name="com.google.firebase.MESSAGING_EVENT"/>
            </intent-filter>
        </service>
- in your android application class, implement LifecycleObserver interface and add the follwing lines
public class MainApplication extends Application implements ReactApplication, LifecycleObserver {
    @Override
    public void onCreate() {
        // onCreate method body
        super.onCreate();
        SoLoader.init(this, false);
        initializeFlipper(this);
        // ...
        // add this line of code
        ProcessLifecycleOwner.get().getLifecycle().addObserver(this);
    }

    // also add the following two methods
    @OnLifecycleEvent(Lifecycle.Event.ON_STOP)
    void onAppBackgrounded() {
        //App in background
        Appgain.onAppBackgrounded();
    }

    @OnLifecycleEvent(Lifecycle.Event.ON_START)
    void onAppForegrounded() {
        // App in foreground
        Appgain.onAppForegrounded();
    }
}
Initializing
To initialize appgain SDK, call the following method on app start
async () => {
    try {
        await AppgainSDK.initSDK(
            "projectId",
            "apiKey",
            true
        );
    } catch (error) {
        console.log("Error: ", error);
    }
}
Set Custom User Attributes
    try {
        let userData = {
            // user data
        };
        await AppgainSDK.updateUserData(userData);
    } catch (error) {
        console.log("Error: ", error);
    }
Deferred Deep Linking
After a new user has installed your app, our SDK will detect if the app was installed from a smart deep link or not, if it's then our SDK will automatically route their flow to marketing campaign desired location in the app (not just to the default home screen).
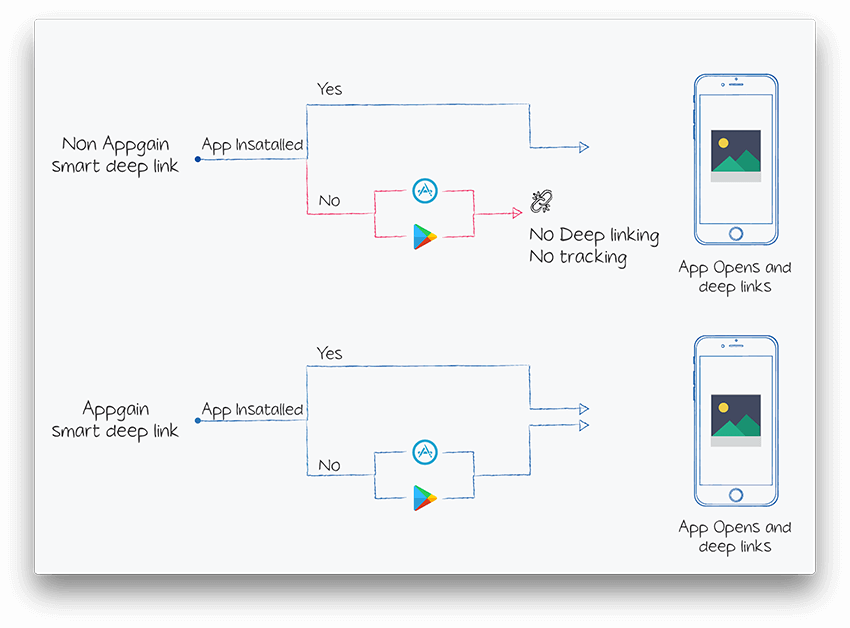
To achieve that, appgain.io SDK must be installed in the app, and the matching process must be initiated
async () => {
  try {
                let  result  = await AppgainSDK.matchLink()
                Alert.alert("response  "  result);

              } catch (error) {
                console.log("Error: ", error);
                Alert.alert("Error: ", error);
              }
}
The following data are returned on matching success in the response object :
| Returned Field | Description |
|---|---|
| smart_link_url | the URL of smart deep link used to open or install the App |
| smart_link_id | the Id of smart deep link used to open or install the App |
| smart_link_name | the Id of smart deep link used to open or install the App |
| match_type | how the device identification done , it could be basic(Digital fingerprinting) or advertising_id |
| extra_data | array of more data |
| extra_data.userId | user Id that was appended to smart link url on opening it phase |
| params | array of all paramaters appended to smart link url , like SDL URL?utm_source=fb |
| smart_link_primary | primary redirection action |
Marketing Automation
async () => {
    try {
        await AppgainSDK.fireAutomator({triggerPointName: "triggerPoint", payload: {key: "value"}});
    } catch (error) {
        console.log("Error: ", error);
    }
}
Notification Channels
async () => {
    try {
        await AppgainSDK.addNotificationChannel(
            type,  // 'email' or 'SMS'
            item // user email or phone number
        );
    } catch (error) {
        console.log("Error: ", error);
    }
}
Revenue Tracking
async () => {
    try {
        await AppgainSDK.addPurchase(productName, amount, currency);
    } catch (error) {
        console.log("Error: ", error);
    }
}
Custom Events Tracking
whenever you want to log user event , add below code
async () => {
    var type = "type";
    var action = "action";
    var extras = {key: "value"};
    try {
        await AppgainSDK.logEvent(type, action, extras);
    } catch (error) {
        console.log("Error: ", error);
    }
}
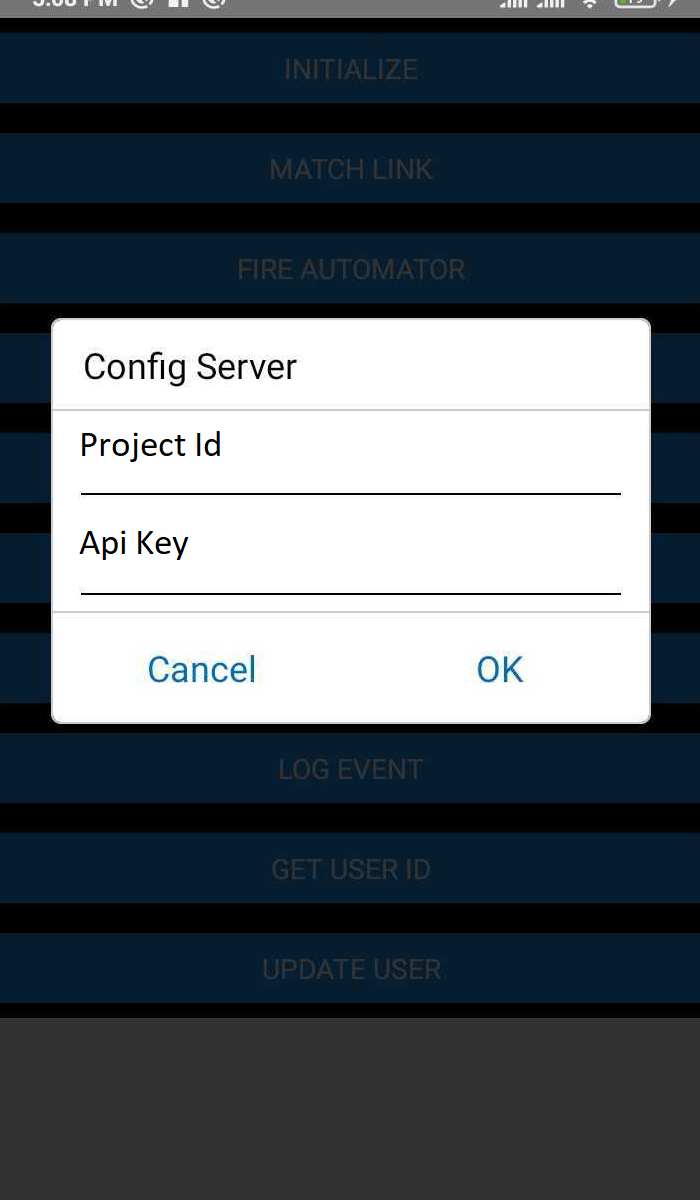
Finally You Can Use Appgain ReactNative SDKTestApp to Test Appgain Features Before Integrate Your App with Appgain
Just Get ProjectId and API Key from Appgain Dashboard , After Install React Native SDK Test App , Set ProjectId and Apikey at Configuration Set Up , and Test Appgain Features